On this page we document our explorations of
processes, materials, & ideas
Working with Makey Makey
&
Chibitronics
|
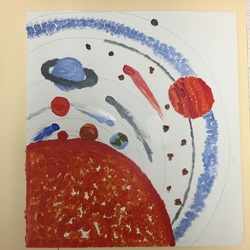
Keanna Jardine - Makey Makey Project
This project was inspired by my career goal which is Astronomy. it is my rendition of our solar system currently, it does not have all the planets but I fit the most known ones in the picture. I should be fun to guess which one's which.I created this cutting out a piece of foam board and then drawing on my plan and then painting over it with acrylic paint which I mixed to make different colors. This is a cool project because I got to work with the makey makey which was an unfamiliar thing to me and it was the first project I actually used paint on in this class. The beginning stages look good, hopefully it comes out as I would like. |
|
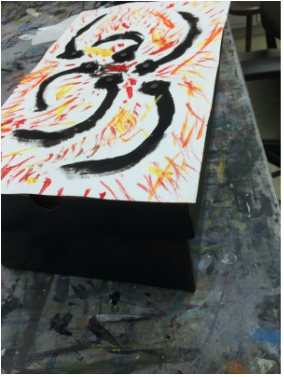
Eric Askedall - Makey Makey Abstract Synthesizer
For my final project I wanted to use the Makey Makey to create a piece of abstract art that acts as a musical instrument. After watching various videos I wanted to make something that had a pleasant artistic feel as well as the joy of using it. I decided to take a shoebox as it seemed to be a perfect fit for all the wiring and keep everything neat. I first painted the bottom of the box black to get rid of labels. I then cut bristol and glued it to the top of the shoebox. After doing some tests I figured out the style I wanted to go for. The design was printed with acrylic paint and after drying I applied nails to each center figure of my abstract design. There are a total of six different sounds that can come out of this unit. The only issue I had at first was grounding the wire so I ended up taking a conductive band and kept it placed around my arm to keep it grounded while using this unit. I went into garage band to get my sounds and it worked great!
For my final project I wanted to use the Makey Makey to create a piece of abstract art that acts as a musical instrument. After watching various videos I wanted to make something that had a pleasant artistic feel as well as the joy of using it. I decided to take a shoebox as it seemed to be a perfect fit for all the wiring and keep everything neat. I first painted the bottom of the box black to get rid of labels. I then cut bristol and glued it to the top of the shoebox. After doing some tests I figured out the style I wanted to go for. The design was printed with acrylic paint and after drying I applied nails to each center figure of my abstract design. There are a total of six different sounds that can come out of this unit. The only issue I had at first was grounding the wire so I ended up taking a conductive band and kept it placed around my arm to keep it grounded while using this unit. I went into garage band to get my sounds and it worked great!
Nicole Leyland - Makey Makey Turntable
For my final project, I wanted to use the Makey Makey. Like I said in the research section of the site, it was something that I've been wanting to experiment with since day 1. Professor Maguire suggested creating a musical instrument as an assignment with this device. I thought that was a great idea, and had loved her examples of "electric guitars" that her own students created. I wanted to choose an instrument that was out of the norm. I decided on creating a turn table. I flipped a cardboard box upside down, so that the bottom was my "table". I found take-out containers that happen to mimic the shape of a record and decided to include it. I also used bottle caps as the nobs and buttons on the top of the table. The needle is a piece of cardboard. I am planning on using the copper strips that came with the kit as a way to conduct the sound from the computer to the instrument. I am going to stick them on my record and when your hand touches it or "spins" it, a scratch noise will instantly happen! So far I think it's coming out alright, I'm happy with the design. I'm using a website called Scratch as a way to store and conduct my sounds. Hopefully it all comes together as I envisioned it!
For my final project, I wanted to use the Makey Makey. Like I said in the research section of the site, it was something that I've been wanting to experiment with since day 1. Professor Maguire suggested creating a musical instrument as an assignment with this device. I thought that was a great idea, and had loved her examples of "electric guitars" that her own students created. I wanted to choose an instrument that was out of the norm. I decided on creating a turn table. I flipped a cardboard box upside down, so that the bottom was my "table". I found take-out containers that happen to mimic the shape of a record and decided to include it. I also used bottle caps as the nobs and buttons on the top of the table. The needle is a piece of cardboard. I am planning on using the copper strips that came with the kit as a way to conduct the sound from the computer to the instrument. I am going to stick them on my record and when your hand touches it or "spins" it, a scratch noise will instantly happen! So far I think it's coming out alright, I'm happy with the design. I'm using a website called Scratch as a way to store and conduct my sounds. Hopefully it all comes together as I envisioned it!
Christina Collado - Makey Makey Piano
For my final project, I decided to use the makey makey. I wanted to try something new instead of doing one of the other projects that we have already done. I made a piano because it is one of my favorite instruments and I knew there would be a good variety of sounds to choose from. I used a shoe box for my piano so I could put the makey akey inside and easily connect it to the conductor from underneath. Initially, I wanted to use nails as my conductor and clip the makey makey to the nails from the inside of the box. However, when I tried this, it turns out that the nails were not conductive. Instead, I used wires and glued aluminum foil to the top of the piano as my conductor.
For my final project, I decided to use the makey makey. I wanted to try something new instead of doing one of the other projects that we have already done. I made a piano because it is one of my favorite instruments and I knew there would be a good variety of sounds to choose from. I used a shoe box for my piano so I could put the makey akey inside and easily connect it to the conductor from underneath. Initially, I wanted to use nails as my conductor and clip the makey makey to the nails from the inside of the box. However, when I tried this, it turns out that the nails were not conductive. Instead, I used wires and glued aluminum foil to the top of the piano as my conductor.


|
Makey Maket Musical Instrument
Omar Altieri For this project we were asked to construct and design a musical instrument that incorporates Makey Makey technology into it. I decided to make a somewhat futuristic electric guitar. Cutting out the shape of my electric guitar deem challenging. I used a precision knife and a ruler to do it. After cutting out the shape, I started working on the design by adding layers onto the basic structure and painting it. Incorporating Makey Maykey into my instrument wasn't that hard. I used wires and copper strips to complete the circuit in order to make sound as the copper strips were being touched. Overall I'm happy with the progress of the project and should be done with it soon. |
|
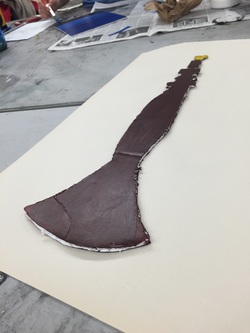
Rupinder Kaur Makey Makey Project IN PROGRESS
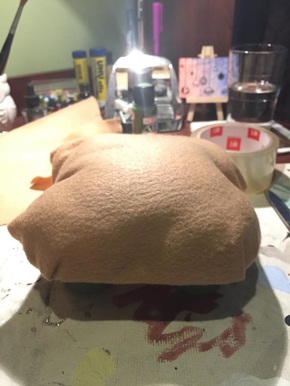
I wanted to do something related to a musical instrument but not something like a piano or the usual choices, I picked this unique instrument from India called a Shennai. It has been used since ancient times and is mostly played during festivals, weddings, and celebrations. It has a unique sound that to me brings about emotion and feeling. I have been listening to music that comes from this instrument since I was little so I can clearly identify with it.
I still have more work and embellishments to add. For example, the strings and holes like the ones on a flute. I still have to find the sound that the Shennai makes on Soundplant or the like and I still have to add the Makey Makey concept.
|
|
Yuhao Qiao
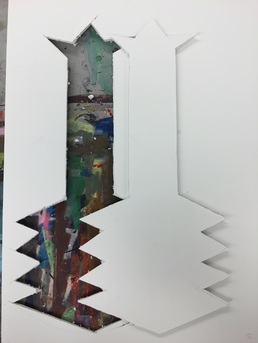
Makey Makey Starry Starry Night For this project combined Starry Starry Night by Don McLean with the painting which the song is based on Starry Night by Vincent van Gogh. The diagram on the left is a plan of how the musical painting will be done. I first numbered the rough flow of the notes (I planned on turning the stars into individual notes) in pencil. After looked up the notes for Starry Starry Night, I color coded the different notes and filled in the colors on the circuit. From there it is very easy to plan out the connections. This will be the bottom layer of the work; a top layer with the stars carved out, exposing the conductive paints will complete the circuit as a finger slide across it. It is my first time doing a more complicated parallel circuit, the connections might be a problem, the path could also possibly be more simplified. In principle, it should work well. I also plan to work in a considerable small size (A4) so that the notes flows quickly and smoothly. |
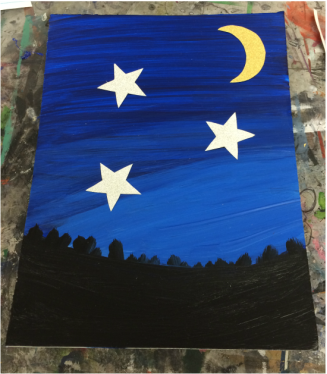
MakeyMakey Final Project Alicia Legland
For our final project, some of us will be working with MakeyMakey. I wasn't sure what I was going to make to create an electronic tactile "instrument". I decided to start with a piece of foam board the size of a regular piece of paper and some paint. I painted a night sky scene with acrylic paint. During the next class when the paint was dry, I added a moon and stars that I cut out of glitter paper. I planned to make these four elements the tactile parts that will be hooked up to the MakeyMakey. Using Scratch to edit the sounds for the project, I found a "shooting star" sound effect and uploaded it. I want to continue adding some more embellishments but for now the "technical" side is complete. I was surprised that as soon as I hooked everything up, it worked successfully and my stars and moon made awesome sounds!
For our final project, some of us will be working with MakeyMakey. I wasn't sure what I was going to make to create an electronic tactile "instrument". I decided to start with a piece of foam board the size of a regular piece of paper and some paint. I painted a night sky scene with acrylic paint. During the next class when the paint was dry, I added a moon and stars that I cut out of glitter paper. I planned to make these four elements the tactile parts that will be hooked up to the MakeyMakey. Using Scratch to edit the sounds for the project, I found a "shooting star" sound effect and uploaded it. I want to continue adding some more embellishments but for now the "technical" side is complete. I was surprised that as soon as I hooked everything up, it worked successfully and my stars and moon made awesome sounds!
Sew Electric Project:
Bookmark Booklight & Plush Monsters
For these projects we work with ideas/processes found in Sew Electric, the work of Leah Buechley, Kanjun Qiu, and Sonja de Boer.
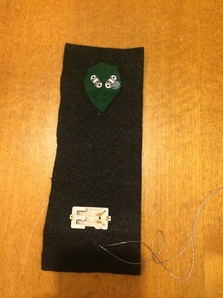
Eric Askedall- Pac-Man Ghost
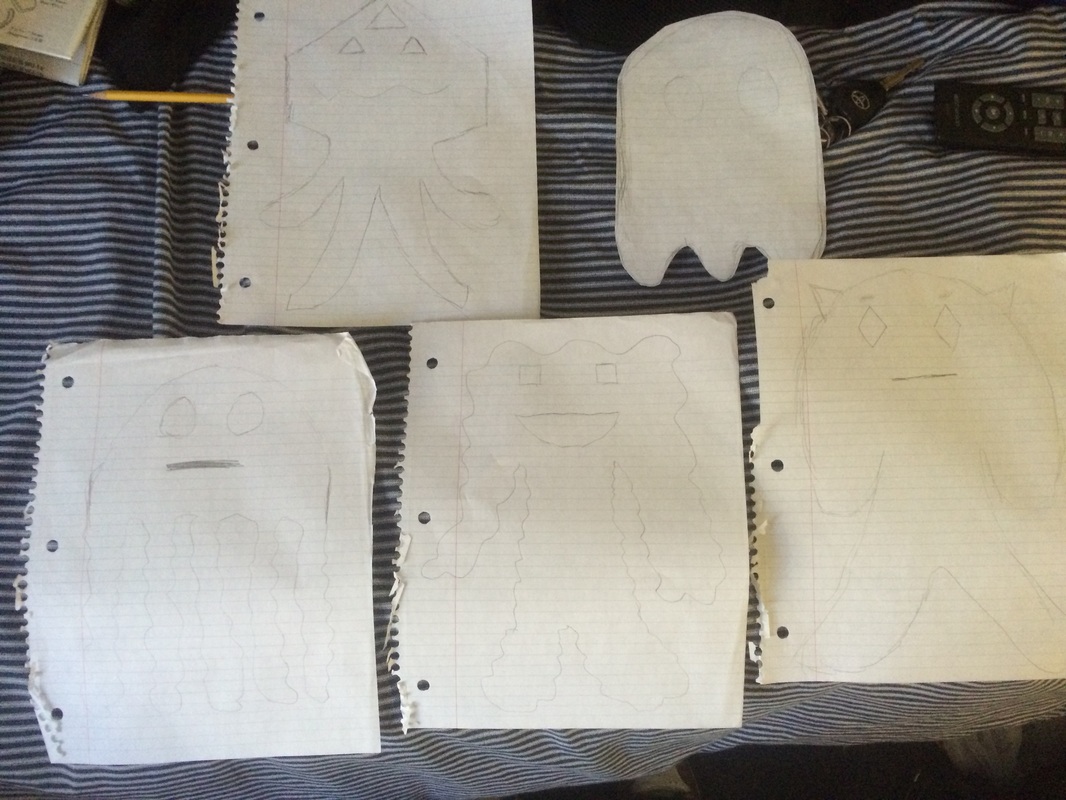
After completing the bookmark project I had become more confident in sewing. This project wasn't much different In the sense of making connections. There were many ideas and sketches, it came down to these few. I felt that my other designs were a bit complex and could create nuisance. So I thought lets keep it simple yet effective. At first I thought I messed something up but I eventually realized it was only a dead battery. I would say the hardest part was sewing the conductive thread which only required one to follow a specific pathway. For the eyes I figured out that a toilet paper roll would be perfect for making a quick perfect circle that I used for the eyes. I felt that the pulsate option of lighting looks the neatest on this form. I've always enjoyed playing Pac-Man so I thought this would be a nice piece of fan art.
After completing the bookmark project I had become more confident in sewing. This project wasn't much different In the sense of making connections. There were many ideas and sketches, it came down to these few. I felt that my other designs were a bit complex and could create nuisance. So I thought lets keep it simple yet effective. At first I thought I messed something up but I eventually realized it was only a dead battery. I would say the hardest part was sewing the conductive thread which only required one to follow a specific pathway. For the eyes I figured out that a toilet paper roll would be perfect for making a quick perfect circle that I used for the eyes. I felt that the pulsate option of lighting looks the neatest on this form. I've always enjoyed playing Pac-Man so I thought this would be a nice piece of fan art.
|
|
Deanna DelSanto-Plush Monster Progress
|
For this project, I decided to do a sort of four tentacled kraken. This project proved to be a challenge due to where I decided to place the light elements. Making a parallel circuit was a bit harder than expected, and took a lot of going back into in order to make it work. In the end, I had to do two separate circuits, one to two lights, the other to the other light. This made it slightly more complicated, but also made me more determined to make it work. It took a lot to get him working, but during the in progress work I learned a lot about working and manipulating a switch and a Tiny Lily. This was my second time working with Tiny Lily, so I had some idea of how to work with it and make do what I wanted, but the process still proved tricky and demanding. Here are some in progress shots.
|
|


|
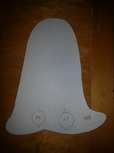
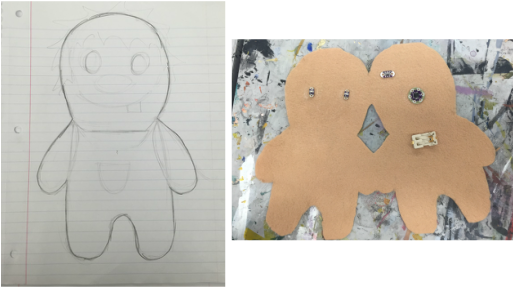
Yuhao Qiao Plush Owl
This design was not too different from the bookmark in terms of the connections - a pair of parallel circuit with two LED lights. The only difference(which is also where I made my mistake) was that the positive and negative/ground terminals were first connected to the lilymini and then from different terminals of the lilypad to the LEDs so that the eyes twinkles. My first also though designed correctly, but the actual sewing by-passed the lilymini so that the eyes lit up but did not twinkle. In the initial design, I have drawn the conductive threads patterned as glasses on the owl's head, but later on I realize that the fabric is thick enough the I could sew without exposing conductive thread. The initial design also did not have the tail, which I spontaneously added to balance the weight of the body as it leans to the left. |
|
|
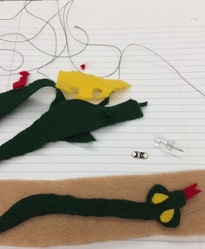
Tatiana Bermeo- Plush Frankenstein
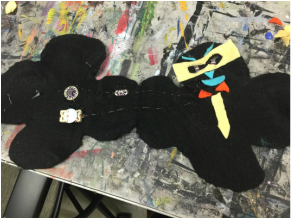
My inspiration for the plush monster was Frankenstein since it was halloween around the time I got started. After I decided what I wanted to create I began to create the template on paper. It was important to draw out where the lili pad, lights, battery holder and switch would go so that I had an idea of how it will turn out. I took a little long with this part of the process since I wanted to find a way so that the lili pad would not be on the outside. Once I figured out a way to make it look how I wanted it to look, I began the sewing process. I almost had no problems with sewing the electric parts down until I realized I accidentally sewed something wrong and had to take part of it off but was able to get over it and finally completed the sewing. I then checked to see if all of my lights worked and proceeded to sew together the two halves and stuff my little frankenstein. Once I Finished I realized the lights did not show through as much as I would of wanted them too because of the color of the felt but since I was basically done I left it as it is. |
|
|
Christina Collado: Plush Monster
For this project, I decided to make a stuffed monster doll. Doing the bookmark project helped a lot in doing this plush monster because I had practice with sewing the conductive thread and how to make a circuit. This made doing the project a lot easier. I thought it was really cool how we could make the lights perform a certain function by using the lilly pad. This project also had an on and off switch to control the lights. This made it a little more complicated than the bookmark because we had to sew more things and be careful not to mess up the circuit. |
|


|
Collin Savage: Scrump (Lilo and Stitch)
Growing up I loved Lilo and Stitch. I get it- it's a kid's cartoon. Well, that cartoon involves a not-so-conventional family, and let's be honest, very few families these days match the standard "mom, pop, and a few kids" idea. So, in the cartoon Lilo has a doll that she made called Scrump. It's not the best-looking doll ever, but to her it's beautiful and it openly shows all the flaws that we all carry within ourselves and oftentimes prefer not to show. She displays these flaws proudly and says it's just the character of the doll, also understanding that appearances matter little when it comes to character. I decided to model the plush monster after Scrump, and making it turned out to be a bit harder than I had thought. |
|

|
|
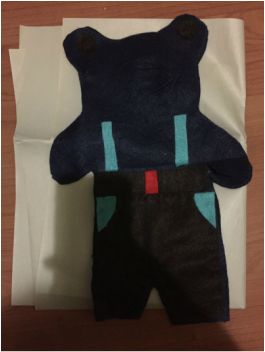
Cassidy Del Orfano: Stuffed Troll
It was important for me to create a monster that was related to my Swedish heritage. Swedish folklore includes many monsters and myths, but I decided to create a troll. My grandmother used to tell me stories about trolls living in the forest. Typically, trolls have messy dark hair, a big nose, a toothy grin, and a tail. Though their appearance can be frightening, trolls are actually benevolent creatures who are supposed to help lost children find their way home. For my design, I wanted the troll to be cute and spunky with glowing yellow eyes. I transferred the design to felt and cut out the shape. Then, I began to make the eyes, nose, and overalls shapes. |
|

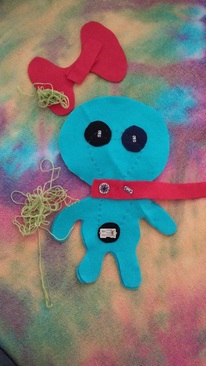
Keanna Jardine: Plush Teddy Squirrel Monster
My inspiration for this was the Berenstain bears because one of the bears always had a jumper on like my plush monster does but I also wanted to incorporate a monster feel to it so i made the mouth,tail and the face monster like. It is still progressing and getting to its final stage. It was difficult putting my sketch into practice because you deal with so much material but the most difficult part so far was making the front and the back match up perfectly so that you don't have a lopsided bear. |
|

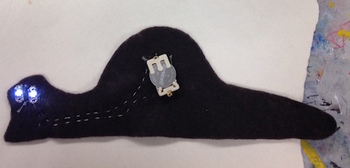
Jackie Perez: Pirate Penguin Plush
After learning from the previous project, I had decided to
not use a design that involved intricate detail. As a result,
I decided to do a penguin and incorporate a pirate
costume to him. Although he is quite not ready, I have
yet to add a skull to his bandanna and an eye patch to his
right eye. I am very excited to work with this project
because I feel that I have gotten a lot more comfortable
working with felt than I previously did for the last
project. The only issue I am facing now is outlining
a pattern that will allow me to successfully add my
lights.
|
Rupinder Kaur's
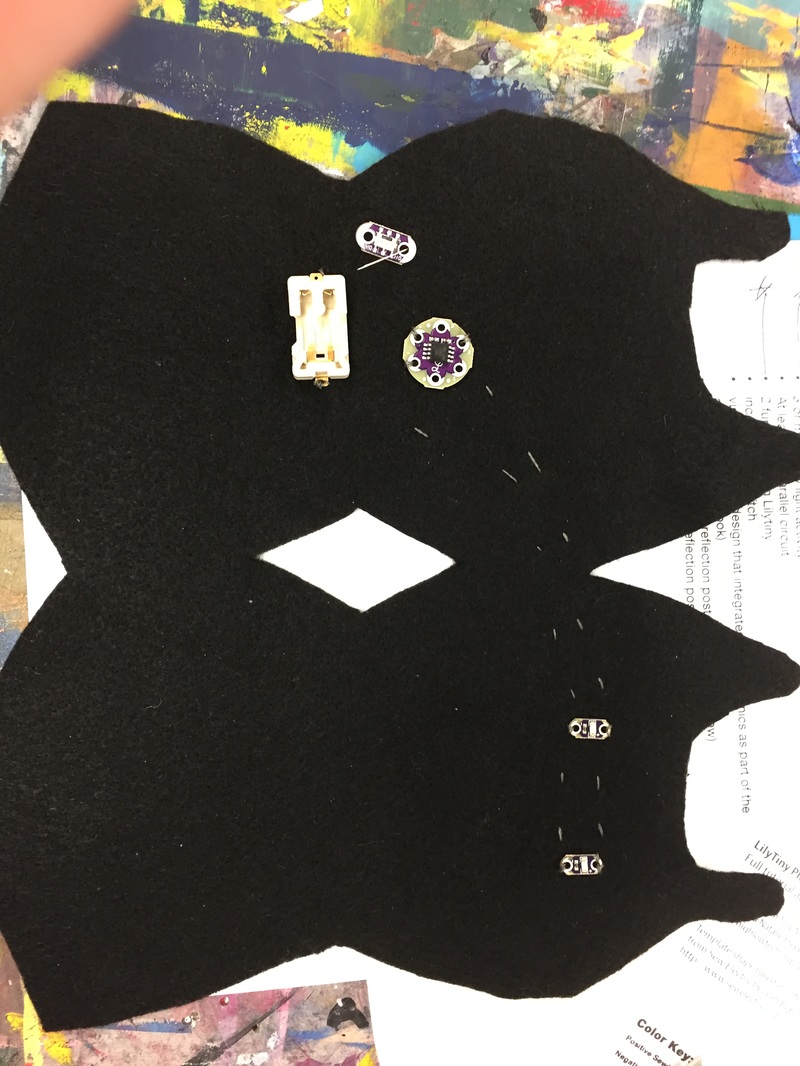
Plush Monster In Progress! For this project, I have decided to make a masked robber looking thing. I did not really plan anything specific. I just created a shape and just let the ideas come to me as I worked on it. I think it is coming out pretty okay. I just have to start the sewing process. I think it is really interesting on how the circuits work. My favorite thing is the switch that allows the function to turn off or on, |
|
|
|


|
|
Plush Monster
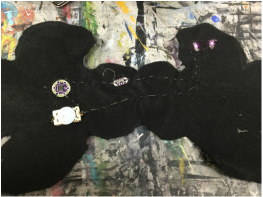
Omar Altieri After gaining some experience after we finished our bookmarks, we were asked to create a plush monster than lit up. The difference between the bookmarks and this project was that this project required us to incorporate a lily pad which allowed the LED lights to light up in intervals and to incorporate an on/off switch. After thinking for awhile I decided to create a black cat whose eyes lit up in intervals. This idea was influenced by ancient Egyptian society who thought of cats as sacred animals. Some challenges I faced while working on this project included: figuring out how to complete the electrical circuit to allow the LED lights to turn on and off properly and cutting out the felt to that both sides would be symmetrical. I also found sewing the edges with the stuffing inside somewhat challenging. If I would do this project again I would most definitely spend more time in the beginning planning out my procedure instead of doing it as I went on. |
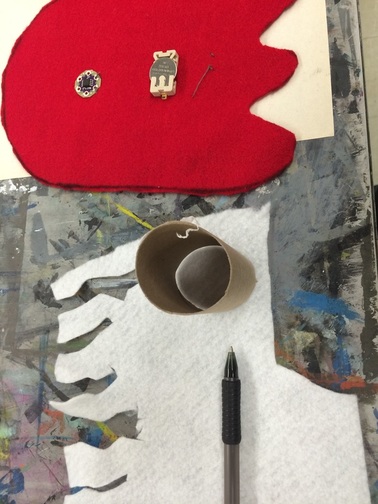
Alicia Legland- Plush Monsters
After making the bookmark booklight, we are now making plush monsters with the same Sew Electric technology. For this project I decided to make a gingerbread man. I figured that the aesthetic of Christmas lights and decorations on the gingerbread man will work well with the LED lights we will be using. I didn't have any light brown felt to use as the traditional color of gingerbread; so instead I used red felt and will decorate with green felt to complete the design. I felt a little more comfortable sewing the conductive thread since I had some practice working on the bookmark. I will be attaching three LED lights (which will be used as buttons for the gingerbread man) a switch, the Lily Tiny microprocessor, and a battery holder all within a parallel circuit. So far I connected the positive side of the circuit; I will be connecting the other side and then sewing the gingerbread man together to stuff it. I'll finish off the project by adding any embellishments that will complete the Christmas-time aesthetic (i.e. garland, ribbons, etc.)
After making the bookmark booklight, we are now making plush monsters with the same Sew Electric technology. For this project I decided to make a gingerbread man. I figured that the aesthetic of Christmas lights and decorations on the gingerbread man will work well with the LED lights we will be using. I didn't have any light brown felt to use as the traditional color of gingerbread; so instead I used red felt and will decorate with green felt to complete the design. I felt a little more comfortable sewing the conductive thread since I had some practice working on the bookmark. I will be attaching three LED lights (which will be used as buttons for the gingerbread man) a switch, the Lily Tiny microprocessor, and a battery holder all within a parallel circuit. So far I connected the positive side of the circuit; I will be connecting the other side and then sewing the gingerbread man together to stuff it. I'll finish off the project by adding any embellishments that will complete the Christmas-time aesthetic (i.e. garland, ribbons, etc.)

|

|
LED Light/Lily Pad Monster Doll - Nicole Leyland
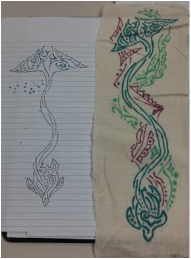
For this project, I created a lizard/angler fish hybrid monster. I love how the angler fish has the light at the end of it's head as a way to attract it's pray. I thought that would translate well into this project with the use of light and it's different functions. Figuring out the connection/circuit wasn't easy. I wanted to make sure that everything would line up perfectly to conduct the current. I sketched it all out on my scrap copy before I started sewing. I think I spaced all of the parts too far apart. I had a little difficulty sewing the positive and negative lines, making sure they didn't cross at the light on the top of the head. I think that it would have been an inevitable difficulty in regards to the shape of my design. I actually sewed it all tonight and the current worked out perfectly...BUT...my purple LED light for my monster's eye went out! The green one started to blink as you can see in my photo.I'm a little annoyed that after all of this careful planning and time spent on it, that I have to re-sew it. However, now I worked out a few of the kinks!
Bookmark Booklights!
Ice Skating Penguin by Deanna DelSanto
For this project, I was a little stuck. With the help of some of my peers, we came up with the idea of a penguin. I then added the idea of him "skating," using the thread to represent his path, and the lights to indicate where he turns. I started with a simple blue piece of fabric, to represent the ice. Then, I created the penguin, and hot glued him to the top. Finally, I stitched in the lights, being very careful not to cross threads and make sure the thread looked like marching ants.
Reflection: My first attempt at this project did not go as well as I intended it to. My sewing was too far apart, making the lights very faint and hard to see. So I had to redo the stitching. It's funny to me, because I have worked with this before and I grew up sewing. My second attempt went much better, the sewing looked a lot better, and it also helped make the lights shine nice and bright. Unfortunately, I am not the best sewer so there was a lot of finger poking with the needle. Overall though, I really enjoy making projects with lights. It's very exciting to see what you can do with a little conductive thread and some LED lights. It allows for a different kind of creativity that I don't get to play around with every day. Hopefully by my next project, I'll get better with the sewing.
Reflection: My first attempt at this project did not go as well as I intended it to. My sewing was too far apart, making the lights very faint and hard to see. So I had to redo the stitching. It's funny to me, because I have worked with this before and I grew up sewing. My second attempt went much better, the sewing looked a lot better, and it also helped make the lights shine nice and bright. Unfortunately, I am not the best sewer so there was a lot of finger poking with the needle. Overall though, I really enjoy making projects with lights. It's very exciting to see what you can do with a little conductive thread and some LED lights. It allows for a different kind of creativity that I don't get to play around with every day. Hopefully by my next project, I'll get better with the sewing.


|
Bookworm Snail by Yuhao Qiao
I wanted to make a bookmark that reminds me to slow down and think about what I’m reading, and what better representation of slow than a snail? I first drafted what I want on a piece of paper. This outline of the snail, it turns out, was very important. I found it difficult to cut the fabric to the exact shape that I wanted. This problem was solved by first sewing the the paper onto the cloth to fix its position, then cutting out the outline of various parts according to what I drew on the paper. It worked well. 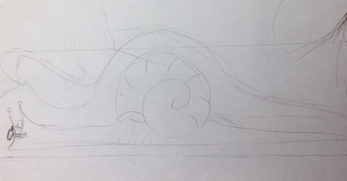
Two white LED light was then sewn at the eyes (or tentacles), with conducting wires to and from the battery. I tried to keep the battery case out if sight, since its shape does not fit in well with the curvy lines of the snail. The battery was installed in the shell, which will be covered with another piece of fabric.
|
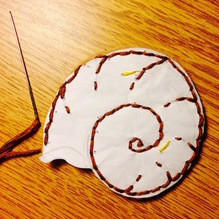
I was pondering between drawing and sewing the patterns and decided to sew the patterns. The pattern on the shell was eventually sewn with brown thread, color darker than the shell itself, as the thread seems a more natural choice on the cloth. I pondered between dotted lines and solid lines, and chose solid lines which better resemble the drawing. Back stitches were
used to better control the direction of the thread. Left and right shows the sewing before and after the paper was removed. Lastly, as part of the efforts to make the snail a bookworm, I made a tiny pair of glasses using black cloth, which I will hot glue on later. 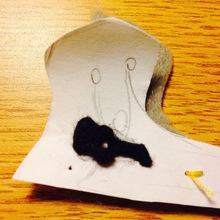
|
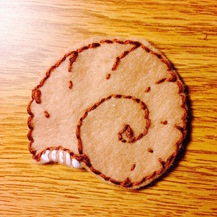
Reflection:
I think the process for the making of this bookmark is generally smooth. The materials cloth and thread are relatively easy to control, although it is not easy to sew circular patterns on the cloth, it was solved by sewing the design onto the cloth directly, and then remove the paper after sewing is done. For the coming class I will find out how to best position the eyes (which will be enlarged to cover the LED lights) above the LED so that the threads are covered.
I think the process for the making of this bookmark is generally smooth. The materials cloth and thread are relatively easy to control, although it is not easy to sew circular patterns on the cloth, it was solved by sewing the design onto the cloth directly, and then remove the paper after sewing is done. For the coming class I will find out how to best position the eyes (which will be enlarged to cover the LED lights) above the LED so that the threads are covered.
|
NIcole Leyland - Bookmark Booklight Project
I was absent on the day this this project was introduced. But after observing this page and seeing what the students in the class came up with/how they got to their final project, I decided to sketch out my idea. I was thinking about having a space theme for my bookmark. I thought that theme would be perfect to include the LED lights and would really pop with the contrast of the black vastness of outer space. Below is my sketch and in progress photos of my bookmark. I wanted to put a sun at the top and a rocket ship flying towards it. I was thinking about putting one of the LED lights in the sun and the other in the flames that will be coming off the rocket. Here's a sketch that I came up with. I'm excited to do this project! I've never sewn before and looking forward to learning. Reflection: As I was creating this bookmark, I was surprise how easy it was to sew. I think the hardest part was threading the needle, but I eventually got better at the more I practice. I really loved looking at the class's ideas! Everyone came up with such unique and creative ways to create their bookmarks. Again, this is another project I NEED to try with my students. I think they would LOVE this. |
|
Cassidy Del Orfano - Bookmark Booklight Project
To begin this project, I began with a sketch to design my piece. I wanted to make sure that the design would be cohesive and well thought-out. I chose lightening bugs because wanted the light-up objects to make sense in nature. Referencing to the sketch, I made some notes with a Sharpie on the felt so I knew what exactly I wanted to do. I sewed the battery holder on, and then followed my Sharpie lines with the conductive thread. Then, I sewed on the lights, followed by the bug bodies, tail and then wings.
To begin this project, I began with a sketch to design my piece. I wanted to make sure that the design would be cohesive and well thought-out. I chose lightening bugs because wanted the light-up objects to make sense in nature. Referencing to the sketch, I made some notes with a Sharpie on the felt so I knew what exactly I wanted to do. I sewed the battery holder on, and then followed my Sharpie lines with the conductive thread. Then, I sewed on the lights, followed by the bug bodies, tail and then wings.


|
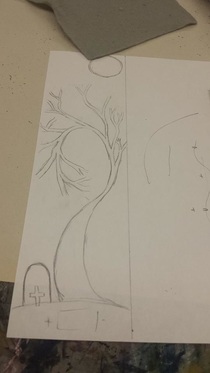
Jacqueline Perez - Bookmark Project
For this project, I originally started out with a drawing of an elephant. However, I realized that cutting this shape out would be nearly impossible for someone who has horrible cutting skills. So I decided to go with a Halloween themed picture instead. I drew a picture of a leafless tree which I plan to use black felt for. For the background, I decided to go with a grey felt to further emphasize the Halloween theme. Seeing that just a tree is rather simple, I decided to add some bats to give it a little more detail. However, after adding the bats I realized that placement was going to be essential because the lights had to be in a certain order. It took me about 3 tries in order to have my bats in a place where the stitching could have a flowing factor to it rather than a random, all-over-the-place feel to it. So far I have left to finish cutting the bats as well as the trees. |
|
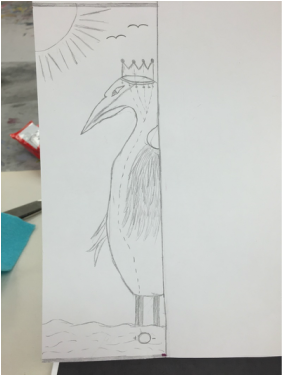
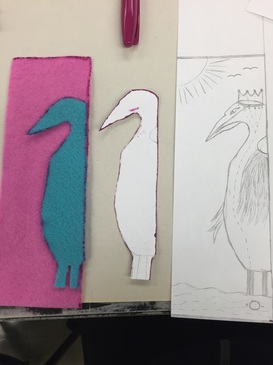
Keanna Jardine - Bookmark Project
For this project, I originally didn't have an idea of what I wanted to do but I searched animals on the internet and a bird engraved in wood came up and I used that idea to create the bird but also add my own elements like a crown and a completely new background. I decided to put the LED in the crown although I wanted it to be along the outer edge of the body. I used bright colors like blue, yellow, and pink because It went well with the scenery of the picture and the feel of the overall artwork. Overall, it was a fun but tedious project because I had problems cutting the felt which caused blisters but it worked out in the end.
For this project, I originally didn't have an idea of what I wanted to do but I searched animals on the internet and a bird engraved in wood came up and I used that idea to create the bird but also add my own elements like a crown and a completely new background. I decided to put the LED in the crown although I wanted it to be along the outer edge of the body. I used bright colors like blue, yellow, and pink because It went well with the scenery of the picture and the feel of the overall artwork. Overall, it was a fun but tedious project because I had problems cutting the felt which caused blisters but it worked out in the end.
|
|
|
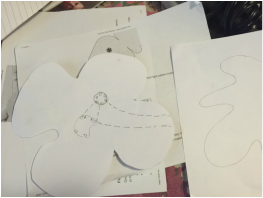
Tatiana Bermeo- Bookmark Project
I enjoyed this project a lot and although it was a process that took time, I really like the end result. We were asked to first create a rough sketch of what we wanted our design to look like and in that sketch we had to mark where we wanted to place the lights. I went with a simple flower design and decided to use three lights. I was familiar with LED lights and the battery holder, in fact the whole process was similar except for the source of conductivity. At first it felt a little over whelming since I had never used conductive thread but as I began the process of sewing I realized it was similar to the project I had done using conductive tape. Once my sketch was done I sewed on one side(negative) of the battery holder to the one side(negative) of the lights. I followed this process for the other side of the battery holder and the lights which was the positive side. In order for the thread to conduct properly it had to be sewn on tightly and the positive and negative sides could not touch. Once the lights and battery holder was sewn on I tested it out to make sure everything functioned well by putting in the battery. Next after I made sure all worked well, all that was left to do was put together the pieces to finish my design. Here are pictures of my process: |
|
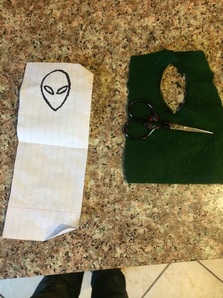
Eric Askedall
I never attempted to sew anything in my life and this was the first. I was surprised to find out it that it was not that hard, just time consuming. I wanted to make a design that would be straight from imagination so I ended up deciding that aliens would be a creative choice as well as universal. So I drew the initial head and followed that as the base design. Later on I decided it would be neat to add ships on to it that makes a nice aesthetic while covering some of the conductive thread. Here are images of initial process.
I never attempted to sew anything in my life and this was the first. I was surprised to find out it that it was not that hard, just time consuming. I wanted to make a design that would be straight from imagination so I ended up deciding that aliens would be a creative choice as well as universal. So I drew the initial head and followed that as the base design. Later on I decided it would be neat to add ships on to it that makes a nice aesthetic while covering some of the conductive thread. Here are images of initial process.
|
|
|
Collin Savage
Trying to create a design that would fit into a bookmark and still have lights seemed a bit odd, but it was a fun project. I didn't take the thread or lights home with me, so I there was little I could do there, but I did manage to develop a design that I liked and that could hold lights without appearing too awkward. I started with researching pictures and templates that I could use, and settled on Polynesian sea animal tattoos. I used a manta ray and a sea turtle with connecting tails. I had to do my design on a cloth material so that I could draw it, but I'm going to connect the cloth to the felt and have the designs overlap and weave together. Here's my progress so far. |
|
Christina Collado - Bookmark Booklight Project
For this project, I decided to make a bookmark with a sheep on at and for the light up component, I made a heart on the sheep. I found my inspiration at a farm I went to the weekend prior where I saw a lot of farm animals and cute sheep. The most challenging part of this project for me was actually sewing the conductive thread because the thread and the needle are very small and it takes a great amount of patience and concentration. When I was sewing on the battery holder, I was sewing the thread in and out of the hole instead of creating a loop around the hole. I couldn't figure out why the battery holder wasn't staying on but after I realized what I was doing, it was easy to sew the rest of the project together. Here are the pictures during the process of my booklight project!
For this project, I decided to make a bookmark with a sheep on at and for the light up component, I made a heart on the sheep. I found my inspiration at a farm I went to the weekend prior where I saw a lot of farm animals and cute sheep. The most challenging part of this project for me was actually sewing the conductive thread because the thread and the needle are very small and it takes a great amount of patience and concentration. When I was sewing on the battery holder, I was sewing the thread in and out of the hole instead of creating a loop around the hole. I couldn't figure out why the battery holder wasn't staying on but after I realized what I was doing, it was easy to sew the rest of the project together. Here are the pictures during the process of my booklight project!


|
Omar Altieri
Last week we experimented with electric conducting thread to light a LED with the the help of a small battery to create bookmarks. As soon as this project was introduced to me, I was immediately amazing by the fact that there existed electric conducing thread and that I was about to use it. I found this project to be very soothing due to the amount of sewing required. Short circuiting posed as a problem for me during my first trial in connecting the LED lights to the battery. Also cutting the felt was hard but I think it was due to the scissors I used. I can be seen below that the cuts made were not fine. |
|
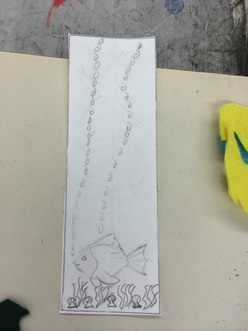
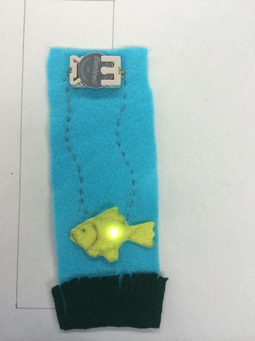
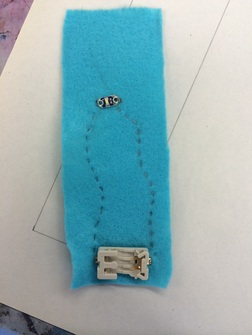
Alicia Legland- Here are a few pictures of my Sew Electric project; we are making LED bookmarks. It's not quite finished yet, but it's almost there. This was my first time sewing before so it took me a little while to get started but I eventually got the hang of it. Professor Maguire had to help me a few times with getting the thread started and she showed me how to knot it. I also had a few trouble spots where I got the conductive thread kinked in a knot or two. But after a few tries I got it down and it worked! As soon as I put the battery in my fish lit up; I was concerned about short circuiting the positive/negative ends but it all worked out. I'm planning to put on a jellyfish over the battery holder to complete the design. I have a piece of purple felt and a piece of tie-dyed purple, pink, and light blue felt that I think will look great for the jellyfish. I'm not sure how I want to attach the jellyfish over the battery holder, however. I can either sew it or hot glue it the way I did the fish and seaweed. Either way, I'll have to attach only the top portion so the jellyfish will function as a flap over the battery holder. Keeping access to this is obviously important so the battery can be taken in and out.
|
|
|
3D Printing/Tinkercad
|
Nicole Leyland - I think this was the most frustrating thing I've ever used. I'm not really a tech-savvy person to begin with, so throwing me into this program made me feel like a deer caught in headlights. I'm still currently trying to figure out how to maneuver things to my liking on this program. Any-who, I was really inspired by this project. I really enjoyed looking at Ernst's work. I tried to emulate my design around something floral/coral -like. Not really sure if I hit the mark on it, but here are some photos of the process!
UPDATE: When I went to meet Denis for my consultation in the 3D lab, my design drastically changed. I was having a hard time trying to maneuver through this program and it wasn't really translating the idea that I wanted to portray. I met with Denis and he gave me a few ideas based on the few shapes I already had in my layout. I decided to take one of the ovals and shift it on it's side. I kept repeating the shape until it substituted the dome shape I originally had. I think it created a lot of movement within my piece. I kept repeating the same shapes, but changed the angle and positioning of it all around the model. I'm actually really happy with how it came out! I'm not really sure if it still resembles coral, but from the areal view, I think it sort of keeps the flower aesthetic. It's funny how you may start out with one idea, but then the project evolves into something all it's own! I think that it was really cool that this completely new design was inspired from my original one! I also decided to print this with clear filament. I thought that "color" would best connect with my design. I actually ended up printing 2 copies of it! I want to try using spray paint and create my own kind of pattern on top of the plastic. |
|
|
Christina Collado - This is the process I went through to create my 3D Printing project. I was playing around with different shapes and trying to alter the shapes from what they originally looked like. I hallowed out a lot of the shapes I used so that when I print the object, it won't be too heavy. I really starting getting the hang of the tinkercad program after playing around with the different shapes, moving them on the workplane, and placing them on the base. I used a lot of differnt shapes to make my 3D project look interesting and the last picture is what I came up with!
|
|


|
Yuhao Qiao's Element
The 3D printing and modeling is very new to me. I had quite a number of designs along the way. I think one of the difficulties I had was really to tell where to stop - or when the design is complete. For a moderate amount of time I played with how to hollow out objects of various shapes, instead of the final design, which I think actually helped as it gave me more flexibility to visualize and create the different patterns. Reflection: I think this is a rather fun project, although it is my first time using such technologies. It's interesting to try out the various combinations of things, in fact at one point I was overwhelmed with ideas because there can be so many variations! Just playing around with how to hollow out the objects, and use the hollowed out object to hollow other objects creates so many unexpected desired/not desired results! I could have planned the project out in more details, since my 'designing' process was simply going with gut feelings, instead of what could have made it a uniform message. |
|
|
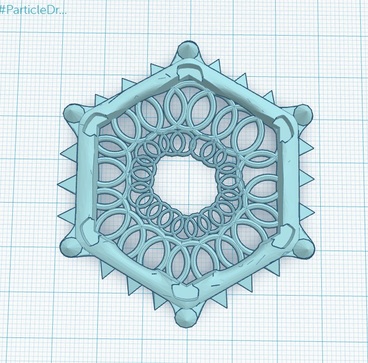
Alicia Legland
Here is an image of my 3D model that I've been working on. I like the modular concept of this project; we are all making a 3D component and the idea is to put them all together to form a dress. I had trouble working on Tinkercad at the beginning. Due to a family emergency, I was out of class the week we really began working on this, so being a little behind was an additional difficulty. However, I went to the 3D studio at the library to meet with the director for some extra help. He gave me another brief tutorial on Tinkercad (because I was having some trouble with the basic functions) and showed me how the class hollowed out the initial form to create more of a blank slate to begin our own designs. Having been inspired by the work of Ernst Haeckel, we tried to keep a natural, organic aesthetic as we created our 3D forms. I did some research on the marine biological organisms (especially the diatoms) that Haeckel discovered and drew, and I liked two specific elements: circular patterns and sharp edges/points. Combining these two ideas, I began to "tinker" with the form and the image to the right is what I've done so far. |
|
|
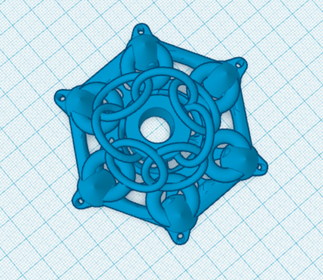
Keanna Jardine - Image of my 3D model. My inspiration for this model was to make a model connected to some architectural structure. I am trying to modify it to make it more to what I expected but this was a great start although I had headaches trying to get Tinker cad to perform the way I wanted it to. This model gives me a vibe of order because of how specific and even everything is.
|
|
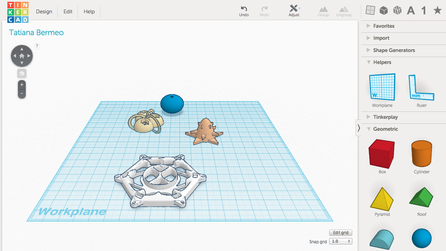
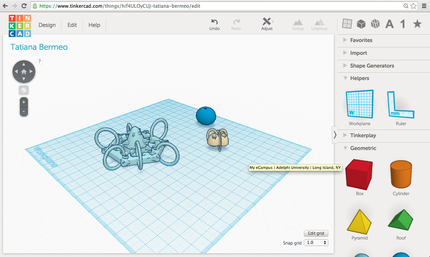
Tatiana Bermeo- These are images of my 3D model so far. It is kind of confusing at first to use Tinker cad but if you do the tutorials and practice you start to feel more comfortable and confident using this program. The first image is just some playing around with the program to practice some of the features it offers. The second image is what I have so far and what my model is starting to look like.
|
|
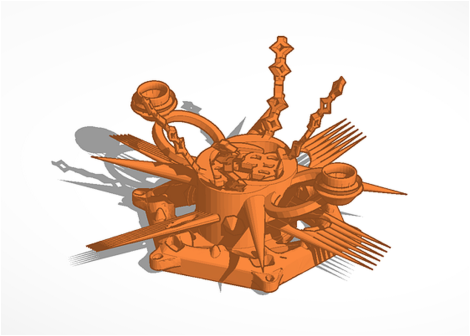
Eric Askedall- Here is an image of my 3D model i've been working on. The only issue I see with this project would be the length to print since this object may be too complex to hollow out. I wanted to create a piece that utilizes most of the work elements and create a object that has a spiky feel while yet being hollow and open. I feel that my design came out to be quite chaotic but collected the sense of repetition. I had trouble at first navigating around my object but after an hour I got pretty comfortable doing so. Learning to use TinkerCad was definitely a positive and fun experience.
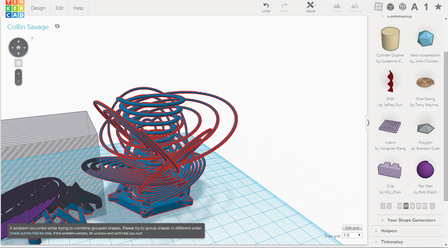
Collin Savage: This project turned out to be a bit more difficult than I had thought with trying in integrate curves or create my own shapes and designs. I found that with TinkerCad, as well as other programs I imagine, the user is still very limited. I did not see a way to just draw in a shape and use that, but rather you have to work with pre-made shapes and manipulate them to create what you want. The shapes move on a grid, which allows you to line them up accurately, but you can't move them as freely as you might want to. I found it very rigid and structured as opposed to fluid. Regardless, the shapes given do allow you to make whatever you could want, even if it is a bit blocky. I still couldn't erase the extra parts and just leave the piece I was working on, since the base seemed to be completely cemented together.
Jackie Perez: This is an image of my 3D model so far. I plan to change it up a bit because I don't really like what I have. However, the experience of learning how to use TinkerCad has been a pleasant one so far. It was hard to get used to in the beginning but as I learned how to manipulate pieces into a shape that I was pleased with, it became a relaxing experience. |
|
|
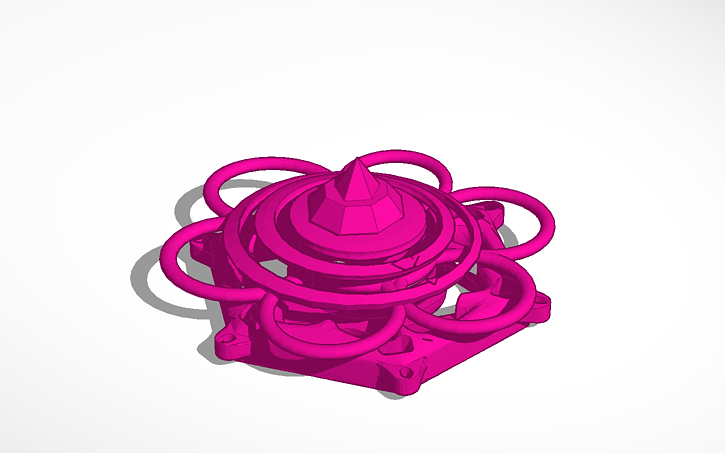
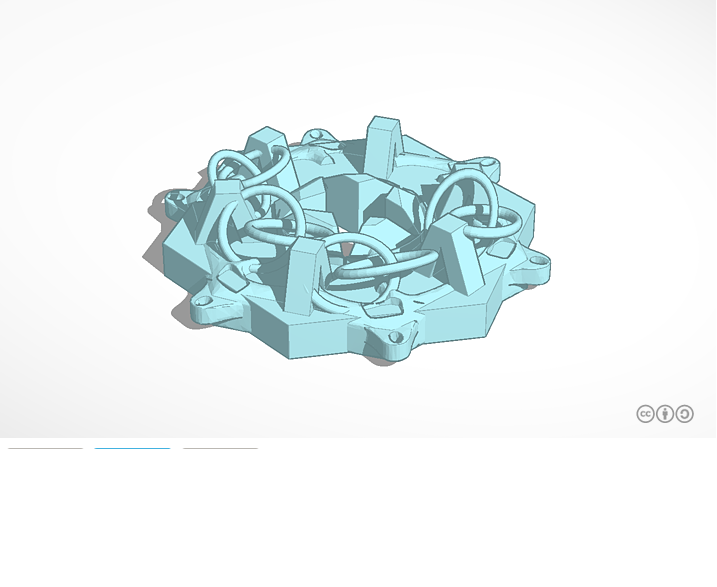
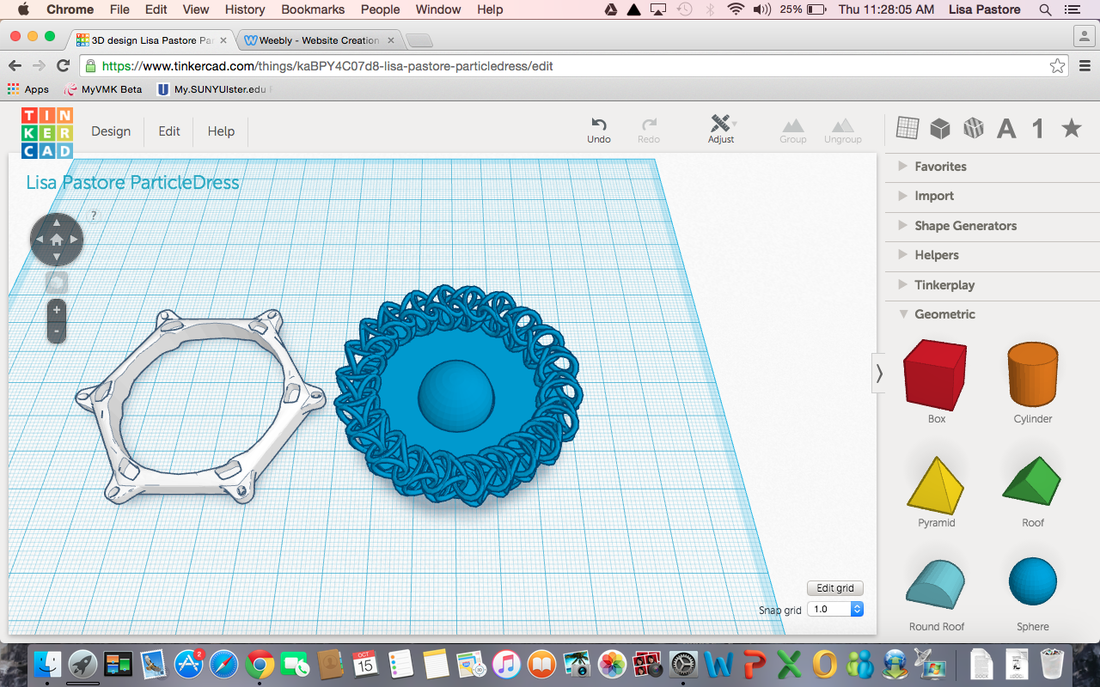
Lisa Pastore: This is the 3D print that I have been working on for the element dress. Inspired by an atom, I created a single chain out of three loops, and then replicated and connected these pieces to form the chain encircling the piece. I then created a small circle that will rotate on the inside of the piece, reminiscent of the rotating movements of an atom. Once you get used to the program, this becomes easier to conceptualize! I had a blast designing this piece!
|
|
|
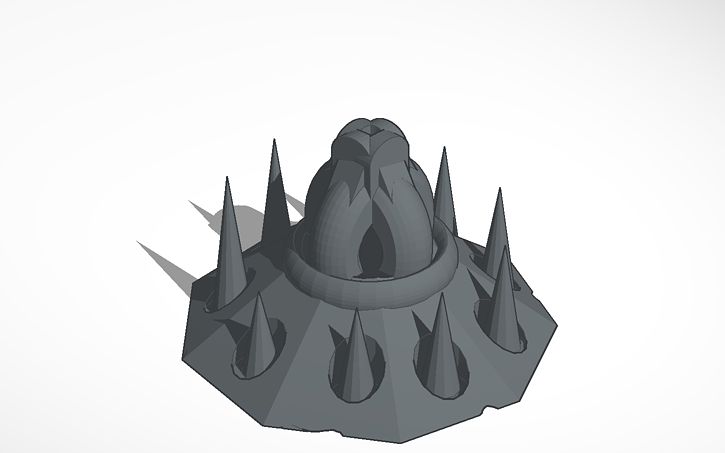
Omar Altieri: This is my 3D model that I've been working for the past week. Originally I thought working with the a 3D software was going to be challenging but after experimenting with Tinkercad it turned out to be quite fun and easy. This is partly due to the simplicity that Tinkercad incorporates into its site. My design was inspired by Mordor from Lord of the Rings which I had watched a few days earlier.
|
|
|
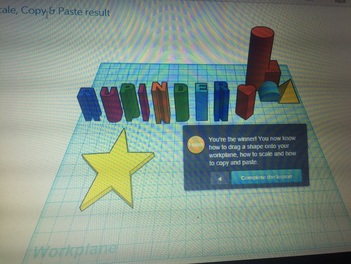
Rupinder Kaur: Playing around on Tinkercad. Better experience doing it yourself than seeing it being done on the computer last class. Can't wait to play around with it more!
|
|
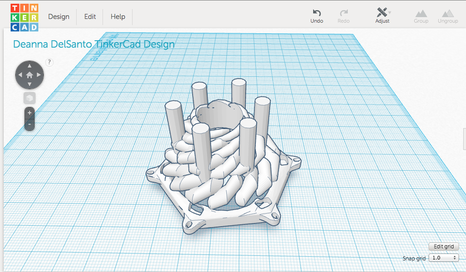
Deanna DelSanto: TinkerCad Design
|
TinkerCad was kind of stressful at first, but after playing around with it for a while, I think I started to get used to it. My first design I came up with kind of resembled a cake (maybe cause I was hungry) so I decided to continue with that in my final design. I kind of wanted to make something just fun and quirky looking, but also not something that's angular and rugged. I noticed a lot of the presets in TinkerCad tend to lean towards the angular, so I tried to stick with rounded and simple shapes. Overall, I'm pretty content with my little, kinda wanna be cake, kinda doesn't know what it wants to be model. I think that while this project was important for me to expand my knowledge of materials and projects, I definitely do not enjoy working on the computer to create art. I prefer a much more hands on experience when creating art, whereas this is much harder to manipulate/control (at least in my opinion).
|
|
Prof Maguire's element. First time designing for a 3D object to be printed. It was a slow start but once I got more proficient with the tools and the interface it became more exciting. I hope to use 3D design with 3D printers into more of my lessons and own work in the future.
|
|
The Neolucida
The NeoLucida is a drawing aid that allows you to trace what you see. It’s a modern reinterpretation of the camera lucida, an indispensable drawing tool popular in the days before photography.
Drawing Machines
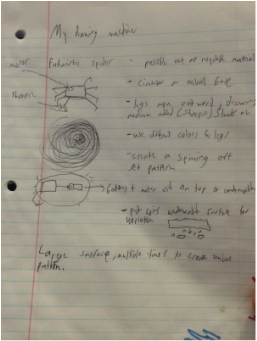
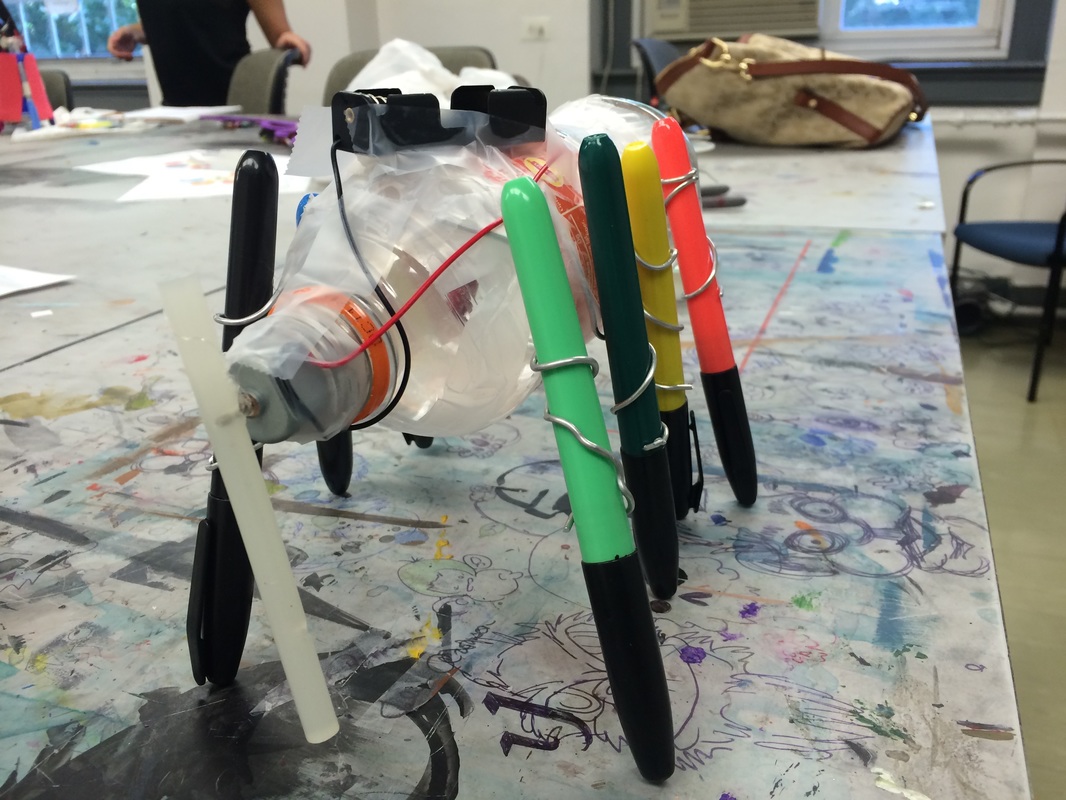
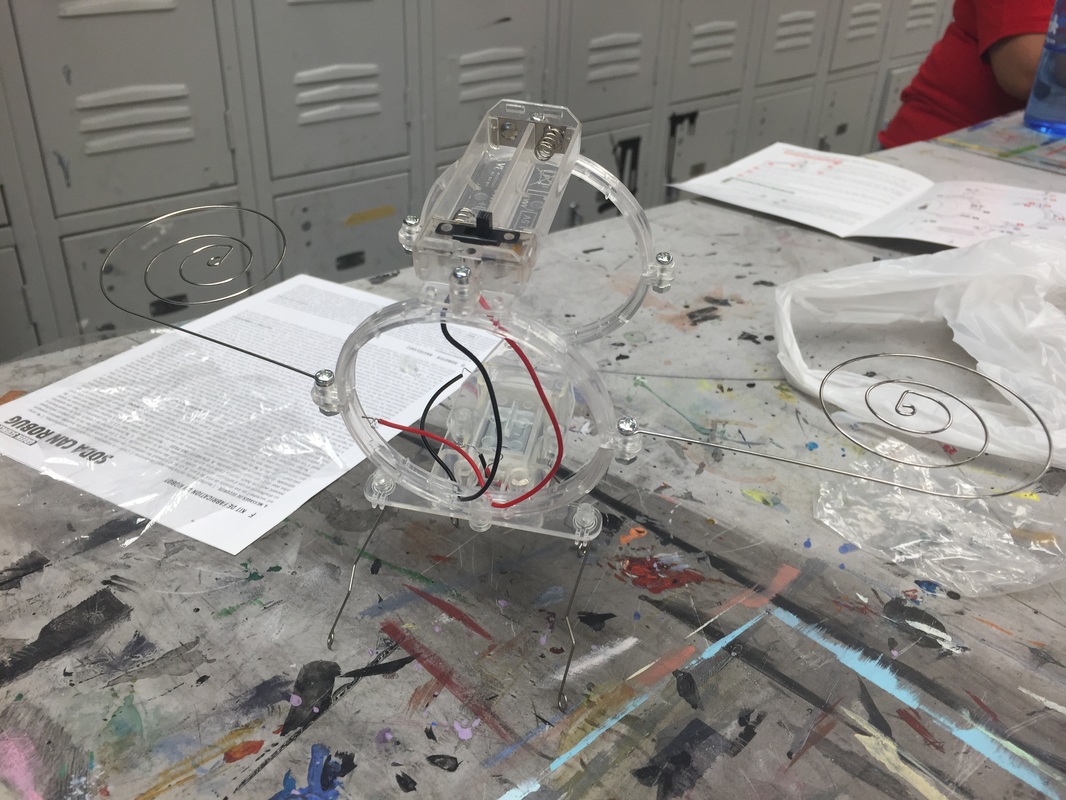
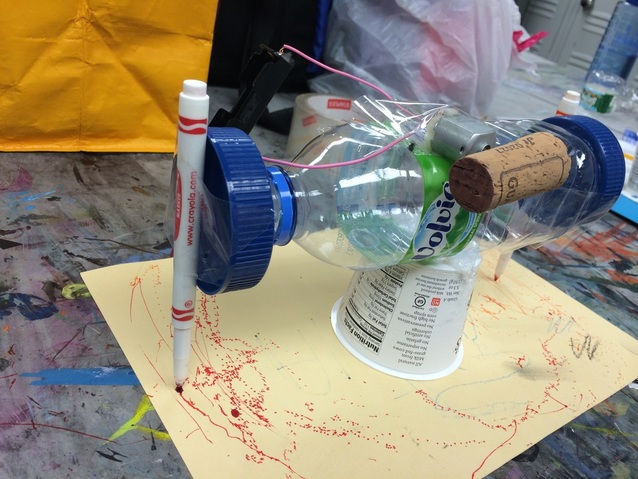
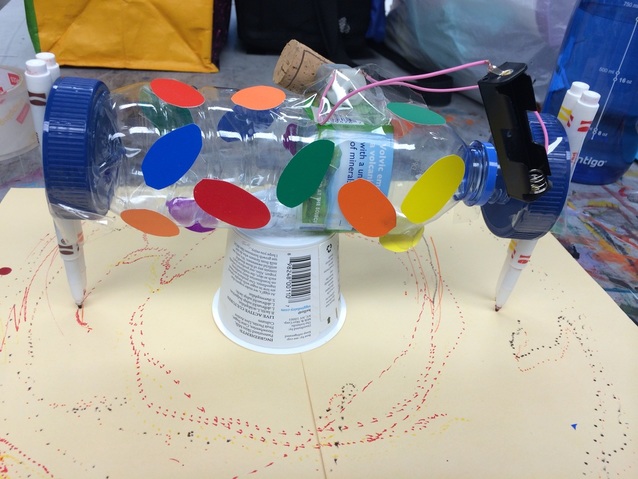
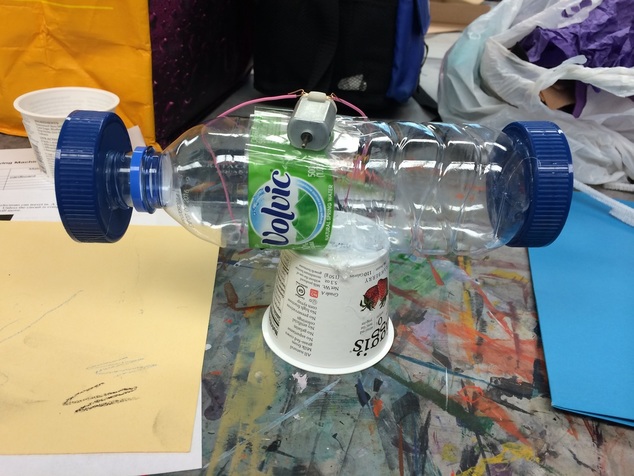
Eric Askedall - Pictures & Sketch of My Futuristic Spider
This was the initial idea base of my design,create a robotic looking spider and use a recyclable base. I wanted different colors and and to create a unique pattern based on the offset of arms. After playing around I found that the motor works best placed in the mouthpiece area compared to to on top. Initially I was using pipe cleaners to hold up bottle but it was not strong enough. By using metal wire I managed to hold up the bottle while keeping the sharpies attached. After trial and error this piece finally gave me the results I was looking for.
This was the initial idea base of my design,create a robotic looking spider and use a recyclable base. I wanted different colors and and to create a unique pattern based on the offset of arms. After playing around I found that the motor works best placed in the mouthpiece area compared to to on top. Initially I was using pipe cleaners to hold up bottle but it was not strong enough. By using metal wire I managed to hold up the bottle while keeping the sharpies attached. After trial and error this piece finally gave me the results I was looking for.
|
|
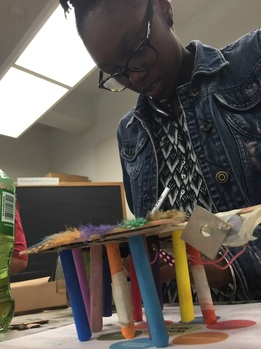
Keanna Jardine - Pictures & Sketch of Butterfly and Bug
This was the beginning process of my bug and butterfly. The second picture shows the drawing chalk legs of the machine and me cutting out stabilizers for the legs to keep the machine from falling and leaning. The butterfly and bug was made of a soft foam material so it was easily bendable which led to difficulty standing up with the legs attached. I started with decorating the machine first and then working on the technical parts like the legs and how it would move. I imagined it would have been a smoother drawing machine but it was a more jagged design which turned out pretty.
This was the beginning process of my bug and butterfly. The second picture shows the drawing chalk legs of the machine and me cutting out stabilizers for the legs to keep the machine from falling and leaning. The butterfly and bug was made of a soft foam material so it was easily bendable which led to difficulty standing up with the legs attached. I started with decorating the machine first and then working on the technical parts like the legs and how it would move. I imagined it would have been a smoother drawing machine but it was a more jagged design which turned out pretty.
|
|
Christina Collado - Constuction of Drawing Machine
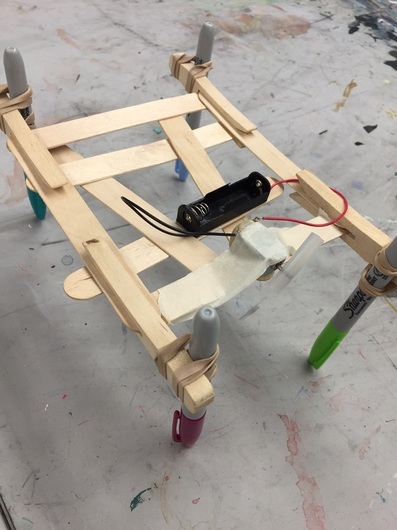
For my machine, I made a cup that twirls around. I poked a hole on the bottom of a plastic cup in order to insert the motor here. This is actual going to be the top of my machine. I put glue around the motor on the inside of the cup in order to make it more stable. I also glued the battery to the motor so the battery wouldn't be swinging around while my machine was moving. A problem that I ran into was that the machine was top-heavy since the motor was on the top so I glued an empty tape roll to the bottom in order to balance the machine. I taped the markers to the outside and this was the construction of my machine!
For my machine, I made a cup that twirls around. I poked a hole on the bottom of a plastic cup in order to insert the motor here. This is actual going to be the top of my machine. I put glue around the motor on the inside of the cup in order to make it more stable. I also glued the battery to the motor so the battery wouldn't be swinging around while my machine was moving. A problem that I ran into was that the machine was top-heavy since the motor was on the top so I glued an empty tape roll to the bottom in order to balance the machine. I taped the markers to the outside and this was the construction of my machine!


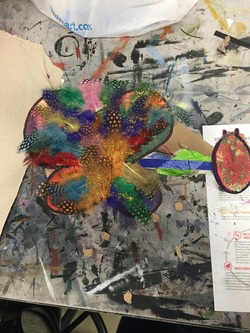
Lisa Pastore - Working with conductive paint, switches and LED lights
Here are some photos on my progress in two of my most recent projects! The geometric design used strips of conductive paint to allow the design to be played like a piano! The heart project was completed in colored pencil and then a circuit for sound and heartbeat lights were added. The lights are built into the heart and the sound is added with conductive paint heart monitor lines!
Here are some photos on my progress in two of my most recent projects! The geometric design used strips of conductive paint to allow the design to be played like a piano! The heart project was completed in colored pencil and then a circuit for sound and heartbeat lights were added. The lights are built into the heart and the sound is added with conductive paint heart monitor lines!


|
|
Nicole Leyland: Constructing Our Drawing Machines
Here are some photos of the beginnings of my construction. I used household objects and recyclable materials. I had an original vision of turning the bowl into some sort of UFO or flying spacecraft. I really liked the shape and that's what it reminded me of. I liked the theme and idea of something along the futuristic line. I found it difficult to secure the marker legs. I had originally tried to just tape them on the outside of the bowl, but it didn't prove to be sturdy and was starting to crack my bowl. Cindy had suggested to make a cardboard support system to attach them to, which you can see in the later photos and that proved to work! I'm still going to tinker with the legs and drawing materials! I'm not sure if this was the final vision I had in mind for my drawing machine...we shall see what happens! |
|
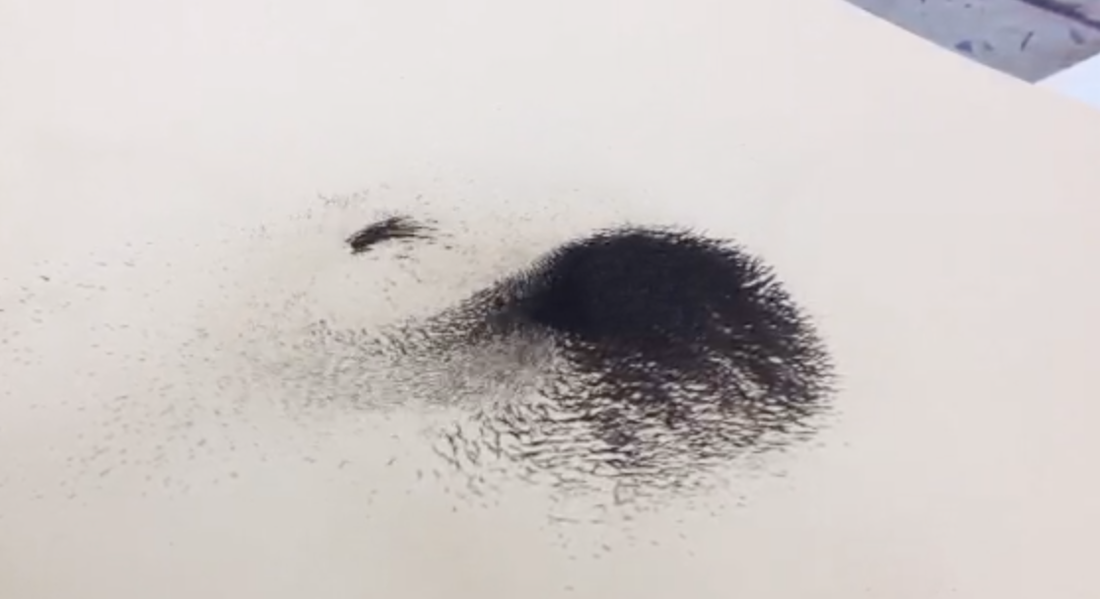
A student in the class, Omar, experiments with prototyping a drawing machine that moves iron shavings by way of magnets. Click on photo for video. Love it! Prof Maguire
|
|
|
Rupinder Kaur
|
|
Alicia Legland: Constructing Our Drawing Machines
|
|
|
|
|
In doing some further research, I found a few examples online of other basic drawing machines also made from recyclable materials. I didn't think that was what I was going to make my machine out of, but after seeing the Professor's bin of recyclables, I knew that was what I wanted to use. As an environmental studies major, anything concerning recycled plastics immediately interests me. The picture at the right was one I found on the internet made from a plastic water bottle. Interestingly, the author who posted this called it a "dribbling machine" instead of a drawing machine.
|
|
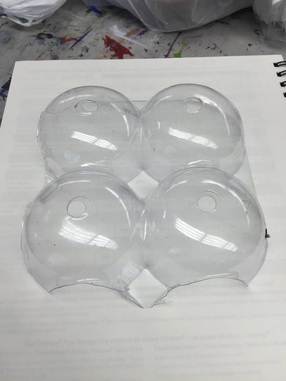
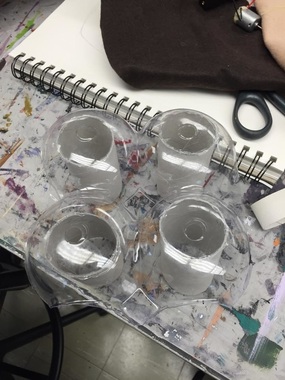
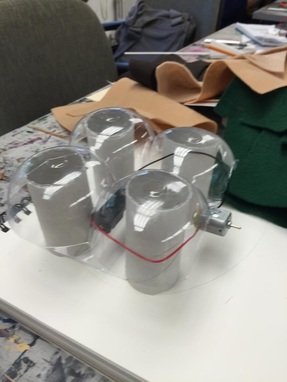
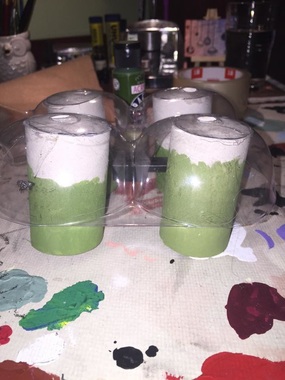
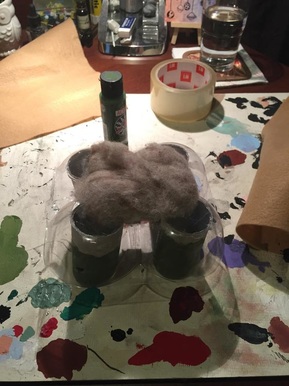
Deanna DelSanto: Designing and Constructing Drawing Machine
I wasn't entirely sure what I wanted to use to make my drawing machine, or what I wanted my drawing machine to look like. With some help from my classmates, I decided I was going to make a turtle/tortoise. Cindy had this really interesting plastic container from the grocery store that's used to hold peaches, which is what I used to make the body. I took some old paper towel/toilet paper tubes and made the legs. I used felt, stuffing and paint to make the shell and color the legs. Here's some of my progress photos:
|
|
|
|
|
|
Omar Altieri- Construction of Drawing Machine
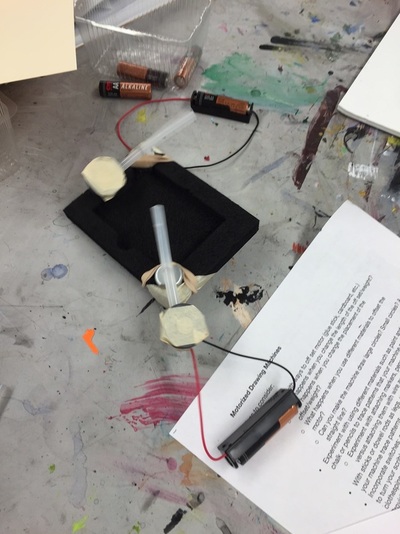
This week I started off experimenting with magnets. I thought it would be interesting if I could somehow cause the metal filings to move it a path on a sheet. My plan was to use magnets and motors from underneath the sheet of paper to move the metal filings on the top... And I failed miserably. The reason to my failure was because I couldn't fine a stable enough base that would absorb the shaking of the motors. So I then decided to construct a four legged stand attached to four markers that would draw on a piece of paper because the motor has been offset.
This week I started off experimenting with magnets. I thought it would be interesting if I could somehow cause the metal filings to move it a path on a sheet. My plan was to use magnets and motors from underneath the sheet of paper to move the metal filings on the top... And I failed miserably. The reason to my failure was because I couldn't fine a stable enough base that would absorb the shaking of the motors. So I then decided to construct a four legged stand attached to four markers that would draw on a piece of paper because the motor has been offset.
|
|
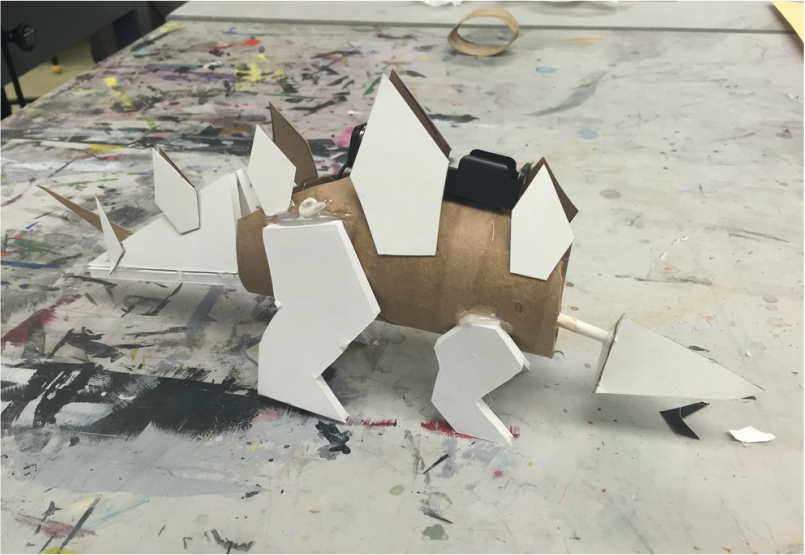
Cassidy Del Orfano: StegoBot - Construction of Drawing Machine
After thinking about many of the things I absolutely love, I decided that it would be interesting to create a dinosaur for my motorized drawing machine. I started with a paper towel roll, foam core and cardboard for the body, legs and tail. The tail is attached to a vertical wire that goes through the body so that as it moves, the tail will wave horizontally.
After thinking about many of the things I absolutely love, I decided that it would be interesting to create a dinosaur for my motorized drawing machine. I started with a paper towel roll, foam core and cardboard for the body, legs and tail. The tail is attached to a vertical wire that goes through the body so that as it moves, the tail will wave horizontally.
Tatiana Bermeo-Drawing machine process
I was kind of inspired on my research of drawing machines from week one about Alan Storey's, Device for Drawing the Movements of a Ballerina, and decided to make my drawing machine actually look like a dancer. I first started by creating what would be the head and then followed with creating a body. Since I needed the machine to be as light as possible so the motor can move it, I used recycled materials.
I wanted to make my machine so that the medium could be replaceable, so I taped on small pieces of pipe cleaners so that I would be able to tie and untie the medium. This attempt did not work out to well since it made the machine unbalanced and I did not like how it looked overall so at home I worked some more on it and changed that idea. The last image shows how it looks now. I just need to make it more visually appealing and make it look more like a dancer. I decided to glue the pieces of pipe cleaner to the sides of the bottom half of my machine instead.
Collin Savage
So, I had difficulties with trying to get my first "machine" to work, and I ended up starting over with a different idea. At first, I was trying to use a motor and some spinning tubes with magnets to move the lead around from underneath a paper. One side was spinning too fast, and the other wasn't spinning at all. Instead, I decided to use some pinwheels with ribbon and paint and just let the wind do all the turning. I used the same structure and put a balloon and let the wind blow that around too. Here's some of the progress.
So, I had difficulties with trying to get my first "machine" to work, and I ended up starting over with a different idea. At first, I was trying to use a motor and some spinning tubes with magnets to move the lead around from underneath a paper. One side was spinning too fast, and the other wasn't spinning at all. Instead, I decided to use some pinwheels with ribbon and paint and just let the wind do all the turning. I used the same structure and put a balloon and let the wind blow that around too. Here's some of the progress.

|
|
