Final Projects
On this page we share our final work/prototypes
3D Printing & Tinkercad
An introduction to designing 3D forms on Tinkercad. For this project we designed simple biomorphic forms inspired by Ernst Haeckel's nature illustrations and radiolarians. We learned of Haeckel's work via the Open Source Element Dress project.
|
|
Lisa Pastore
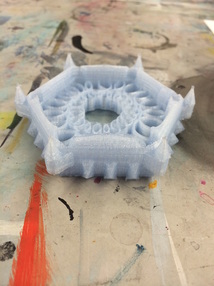
This is an image of my final 3D print. Unfortunately, my first design ended up being too thick for the printer to lay the plastic correctly, so I ended up going back and reworking my design. I had chosen my color for the first design and after seeing the failed print, I was inspired by the color to create a design that mimicked ice. This design was constructed on the same original base, but the top was completely reconstructed using thicker triangles laid in a pattern similar to that of ice shards. Overall, I am happy with my new design and it printed successfully without supports. It was a great experience being able to learn tinkercad and I hope to use it in my future teaching, whether it be art or chemistry. |
|
Yuhao Qiao 3D Modeling
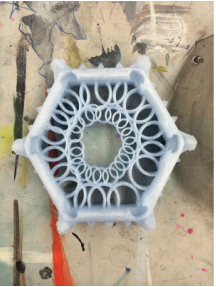
The final design and print both turn out better than I had expected, as my design process did not have any specific direction, but I just tried to make the model look consistent and making constant reference to Ernest Haackel for inspiration. The first print failed because the design was buried under the supports and it was too miniature to show it details. The model was enlarged and the hollow space between the torus body was filled up for the second print. I think I will take into consideration the support. I chose solid colors to better emphasis the fine details on the models' surface. Although by no means intentional, the final work resembles traditional Mongolian patterns frequently seen around my homeland(4th picture on the right), which is a pleasant surprise. Also shown in the slideshow is a mini chair made from 3D Doodler pen in translucent blue. (5th picture) |
|
Rupinder Kaur
|
|
|
Keanna Jardine- 3D Print Form
|
|
|

|
Jackie Perez: 3D Printing Form:
|
Deanna DelSanto-Printed Form
This is the final product of my 3D print out! There were a few kinks along the way before printing that needed resolving, but otherwise it was pretty smooth and easy process. I'm pretty content with how my 3D form turned out (everyone says it looks like a cake!) There were no complications in printing, which was a relief because there were some worries. I also like the material we used to print it, since it is not opaque. I like that it has a transparent look in the coloring, which I feel will be enhanced when the light component is added to it. It was a difficult project for me because I had a hard time conceptualizing the design on the computer, but I would be willing to give 3D printing another shot in the future.
|
|
|
|
Nicole Leyland: 3D Printed Form
Here are the photos of my final product! I think that this protoype came out so cool! I was worried at first if the structure was going to be able to support itself. It had to be reprinted actually because the design didn't seem quite structurally sound. However, Dennis at the 3D lab, was able to correct the issue by printing my creation on a larger scale. I originally printed it in a clear plastic, but I decided to spray paint it with a metallic silver color. I think it really enhanced the look of my design! It was supposed to reference a coral/floral forms. It's amazing to see how much my design had evolved from the 1st time meeting as a group to when it was printed. I have to admit, even though this medium/project really frustrated me at first, I ended up absolutely loving the final outcome. I think that the trick with Tinkercad is practice. Because this was my first exposure to 3D printing, I couldn't quite grasp it right away. I'm really satisfied with my microscopic inspired sculpture! I'm definitely interested in learning more about this medium. |
|
|
Christina Collado - 3D Project
This is my printed 3D model. This was my first experience with a 3D printer and I never really knew how it worked before. I thought it would be difficult to desing a 3D model on the computer but it was actually really fun and interesting because I never use programs like tinkercad on my own. What I liked about tinkercad is that you can alter the workplane and spin it around in 3 dimensions while working on your model. It took a while to get the hang of it but once you do, the possibilities are endless. I really like the way my 3D model came out. I tried to add a lot of different shapes to make it look more interesting and I made a lot of hallow spaces because I knew we would be shining light through our projects. |
|
|
Omar Altieri 3D Project
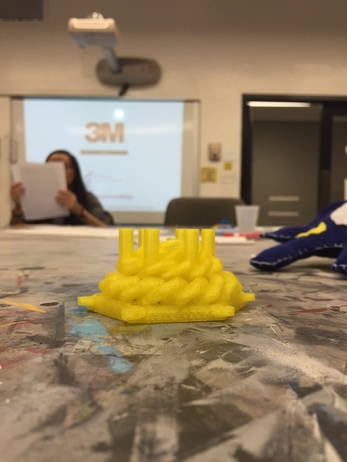
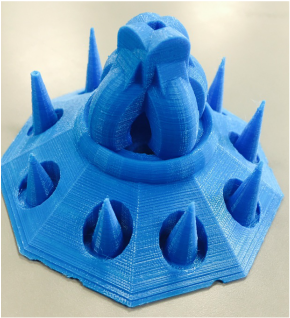
Here is a photo of my printed 3D model. I'm really excited with how it came out. This will be part of a class collaboration to product a huge illuminating 3D model. My piece will be illuminated by putting a LED light bulb through a hole found in the bottom and will sit right below the middle structure. Originally I had planned to make my model gray but after thinking about it I realized that it wouldn't look aesthetically pleasing and that blue would look better after the light was incorporated into the piece.. The only issue I have with this project was that some of the cone-like structures were cut off towards the ends. With that being said, if I would redo this project I would probably avoid putting pointy shapes because the printer could quit get it right. Overall I'm glad with how my 3D model came out and I hope it will fit well with the other models created by the class. |
3D Printing Project
Alicia Legland
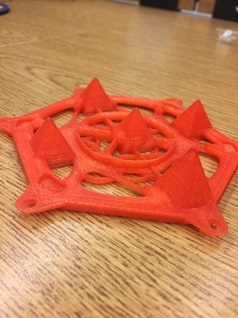
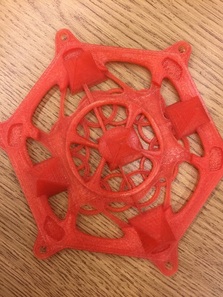
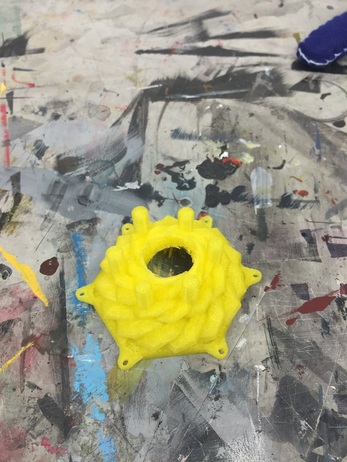
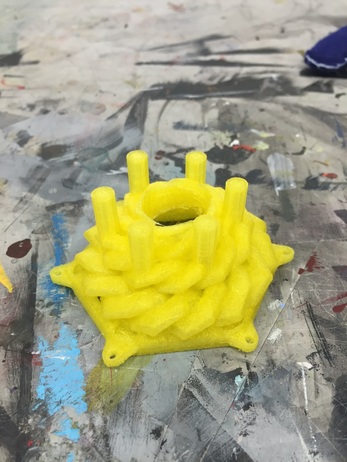
To the right are two photos of my 3D printed project. We used the inspiration of Ernst Haeckel's scientific and artistic work with microscopic marine species. It was my idea to somehow reflect this organic aesthetic into my design. I found a common theme of sharp points and circular patterns among Haeckel's work that I really admired. Using those two aspects, I worked on creating this 3D form with pyramid and cone shapes to create the sharp points and hoops to create a concentric circular pattern. Although we all started with the same base design, we were able to use our own creativity and thought to branch out from the original form to make it our own. Using the Tinkercad program to design the form was quite challenging at first. However, an additional tutorial of how to use the program at the 3D printing studio was very helpful. I ran into a few problems with my first attempt at printing; the form was too small and broke when printing, and some of the pyramids were not fused to the base completely. I had to spend some time editing the design in Tinkercad to fix the problems and print again. The second time was a success and I was happy with the finished product. This was my first experience with 3D printing; I was amazed by the technology and had fun creating my very own print.
Alicia Legland
To the right are two photos of my 3D printed project. We used the inspiration of Ernst Haeckel's scientific and artistic work with microscopic marine species. It was my idea to somehow reflect this organic aesthetic into my design. I found a common theme of sharp points and circular patterns among Haeckel's work that I really admired. Using those two aspects, I worked on creating this 3D form with pyramid and cone shapes to create the sharp points and hoops to create a concentric circular pattern. Although we all started with the same base design, we were able to use our own creativity and thought to branch out from the original form to make it our own. Using the Tinkercad program to design the form was quite challenging at first. However, an additional tutorial of how to use the program at the 3D printing studio was very helpful. I ran into a few problems with my first attempt at printing; the form was too small and broke when printing, and some of the pyramids were not fused to the base completely. I had to spend some time editing the design in Tinkercad to fix the problems and print again. The second time was a success and I was happy with the finished product. This was my first experience with 3D printing; I was amazed by the technology and had fun creating my very own print.
|
|
|
Tatiana Bermeo- 3D Printed Form
This is my final printed form. I enjoyed working on this project with the tinkercad program because it was simply to use. I wanted to create a design that was simple but creative at the same time. I think I got a little carried away with the components of the form and forgot to focus on the size and thickness of my form as well. This was a problem when it came to printing because it cause my form to be too fragile. Also, since the loops I used were to thin, it caused one to break off. Although I was happy with the design, I was unhappy with the way it turned out once printed. I plan on fixing the measurements and re-printing the form but overall this was a trial and error learning experience, which I believe will help me grow as an artist. |
|
|
Cassidy Del Orfano: 3D Printed Form
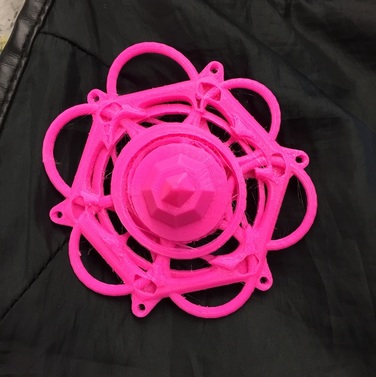
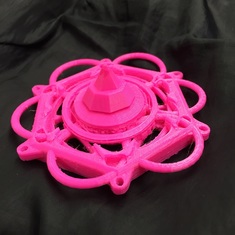
This is the final product of my 3D printing design. I felt that the design should be organic, sleek and simple. I am pleased with how the spiral came out. The inside piece also came out well and adds a second layer for the viewer to look at. The only things missing are little balls that were supposed to be on top of the spikes on the main dome. Color choice was also important. I knew that the piece would be illuminated from beneath, so I chose a semi-transparent color that light could come through. The coolest part is that the color turns pink when exposed to UV light. |
|
Plush Monsters, Makey Makey & Chibitronic Projects
Check out this video of some of our final projects.
|
Rupinder Kaur
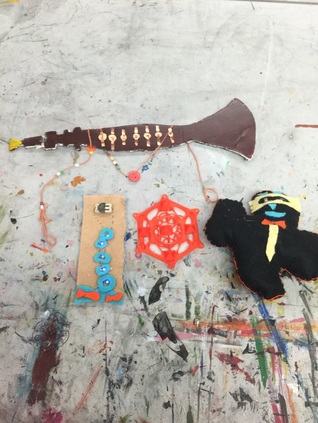
Final Makey Makey Shennai Ancient Indian Instrument Design This is my final Makey Makey Project. For this project I picked an ancient Indian instrument design called a Shennai. I embellished it with some string and beads and wooden looking paint strokes and a mouth piece. I wanted to put the Makey Makey clips to the holes in the center design. When I took it home to finish adding the Makey Makey set up. I had some trouble with it so I brought to class to get some help on and learned that the clips were supposed to be attached to the actual copper to be able to play the sound. And then when we attached it in the classroom the correct way, IT WORKED. This was a great learning experience and a great project that maybe I can apply one day. Below are 4/5 of my final projects that I took a picture of side by side. I learned alot of artisitic techniques in this class that I could apply to other projects and even to everyday life. Maybe I can sew somebodies ripped sweater up! IDK ! Overrall the projects and creations and brain storming was the best part. THANK YOU PROF CINDY! |
|
Yuhao Qiao
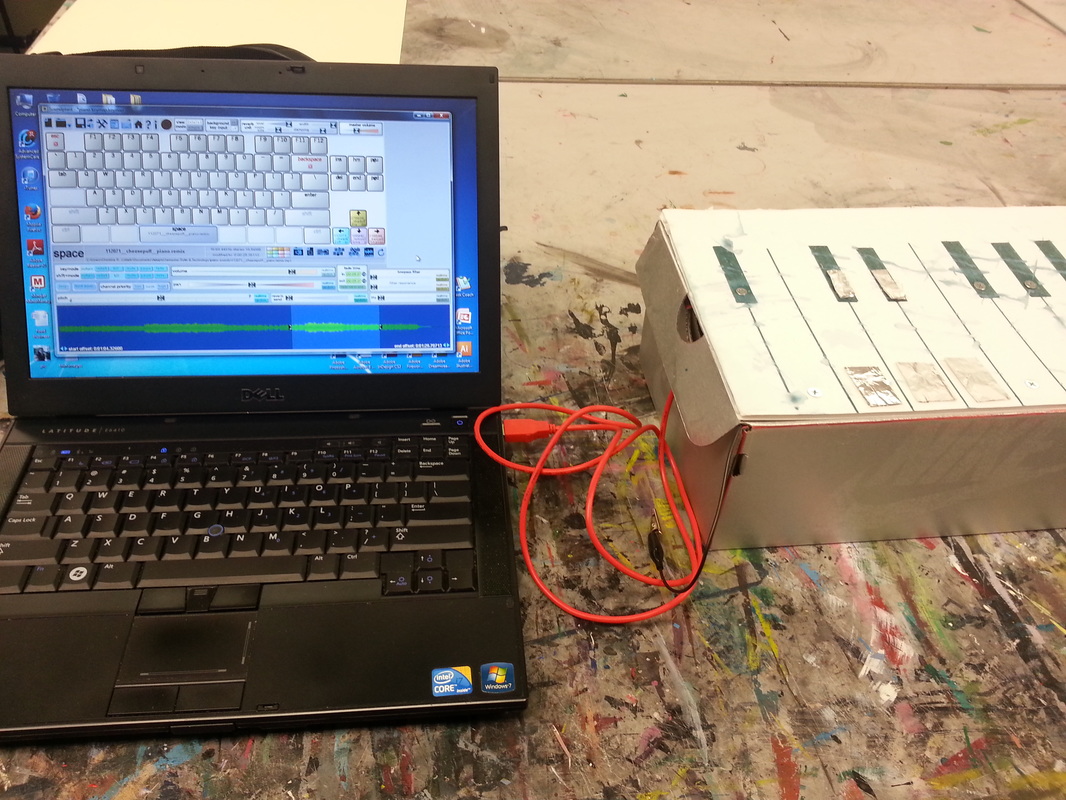
Makey Makey Starry Starry Night Musical Painting For this painting I first printed an outline of Starry Night and carved out the stars. These carved holes, when touched in order, plays the first two verses of the song Starry Starry Night. From these holes and I made an accurate circuit diagram with color codes while trying to avoid any cross connections. To do so, I had to insulate the various conductive paths with a piece of paper to prevent the conductive paints from in touch, although eventually two notes still crossed (I suspect that piece of paper is not good enough an insulator). One unexpected challenge was to find the right piano keys for the song. As someone with limited experiences in music, I though all I had to was to find some keys and fill them in the right place, but some keys were not in the right octave and the whole song sounded weird. I had to test out the song repeatedly and download the keys from two different sources to solve this challenge. One thing I could've done better is to make the carvings bigger, as when the holes are too small, the painting does not always respond when people press it. |
|
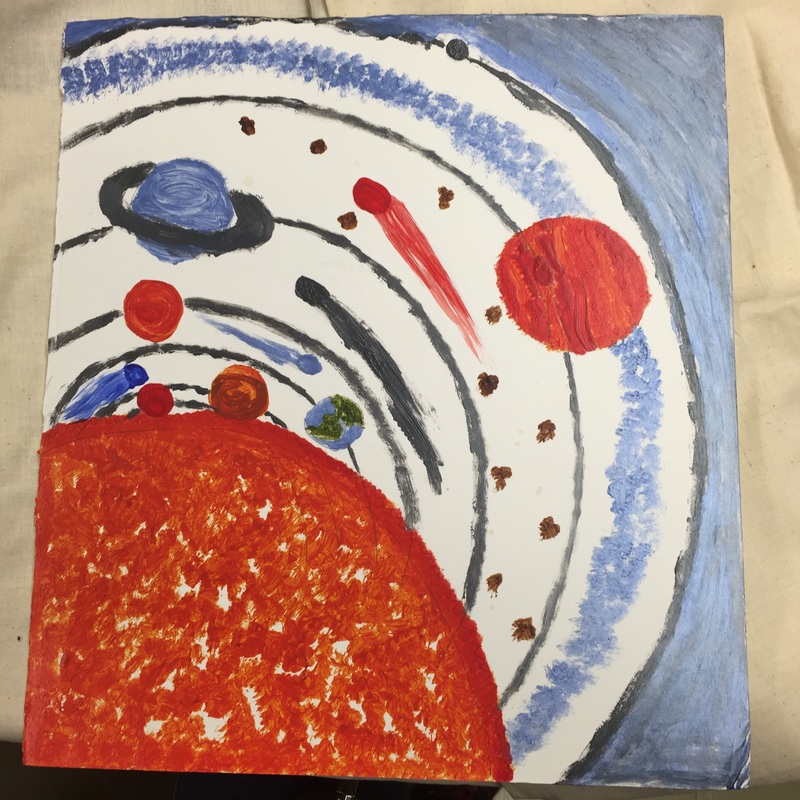
Keanna JardineThis project was inspired by my career goal which is Astronomy. I created this cutting out a piece of foam board and then drawing on my plan and then painting over it with acrylic paint which I mixed to make different colors. This project was the closest to heart because it was based on something I am passionate about and hope to study professionally one day. This was not a tedious project at all, it was completed with ease. It was fun to put sounds that represented space like space rockets, astronauts breathing, mars invasions etc to the different planets and comets. I used wires from the makey makey and bore holes in the bottom of the planets so that it had a small tab that created the sounds on the actual painting and used myself as the ground. Overall, the project was a success and it was uniform with the overall theme I had in mind for the project.
|
|
Eric Askedall - Makey Makey Synthesizer
This is my Makey Makey Synthesizer complete! I found this project fun to make and just as fun to play with. With using garage band the synthesizer worked great, sometime the ground connection to my wrist as a little buggy but after some fine tuning it worked flawlessly.
This is my Makey Makey Synthesizer complete! I found this project fun to make and just as fun to play with. With using garage band the synthesizer worked great, sometime the ground connection to my wrist as a little buggy but after some fine tuning it worked flawlessly.
|
|
|
Nicole Leyland - Makey Makey Turntable
|
|
|
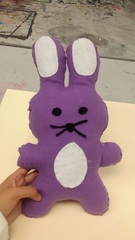
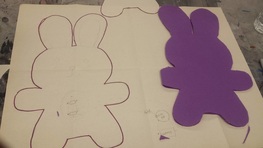
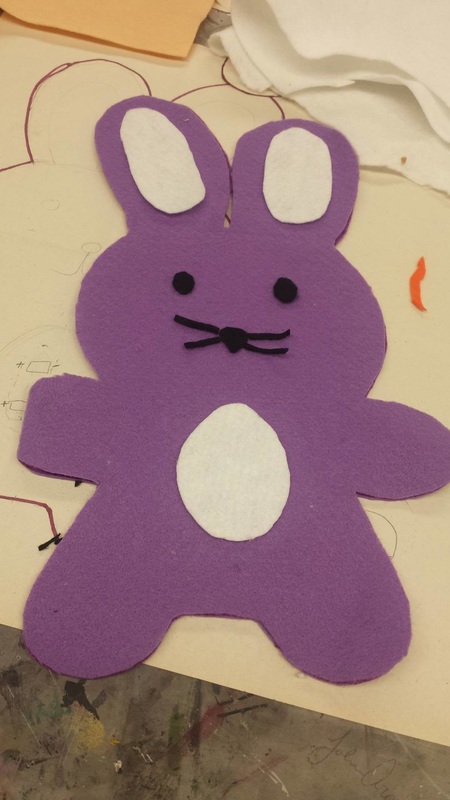
Jacqueline Perez: Plushed Bunny
So for my final project I decided to make another plushie instead of working on the make make because I enjoyed making the first plush. I think I had an easier time making this plush as opposed to the first one because I was already familiar with the process. As a result I think that this plush came out way better than the penguin one. I was more comfortable sewing and using the hot glue gun to apply the eyes, nose, and whiskers. |
|
|
Christina Collado – Makey Makey Piano
|
|
Deanna DelSanto: Final Project
Paper Lights
|
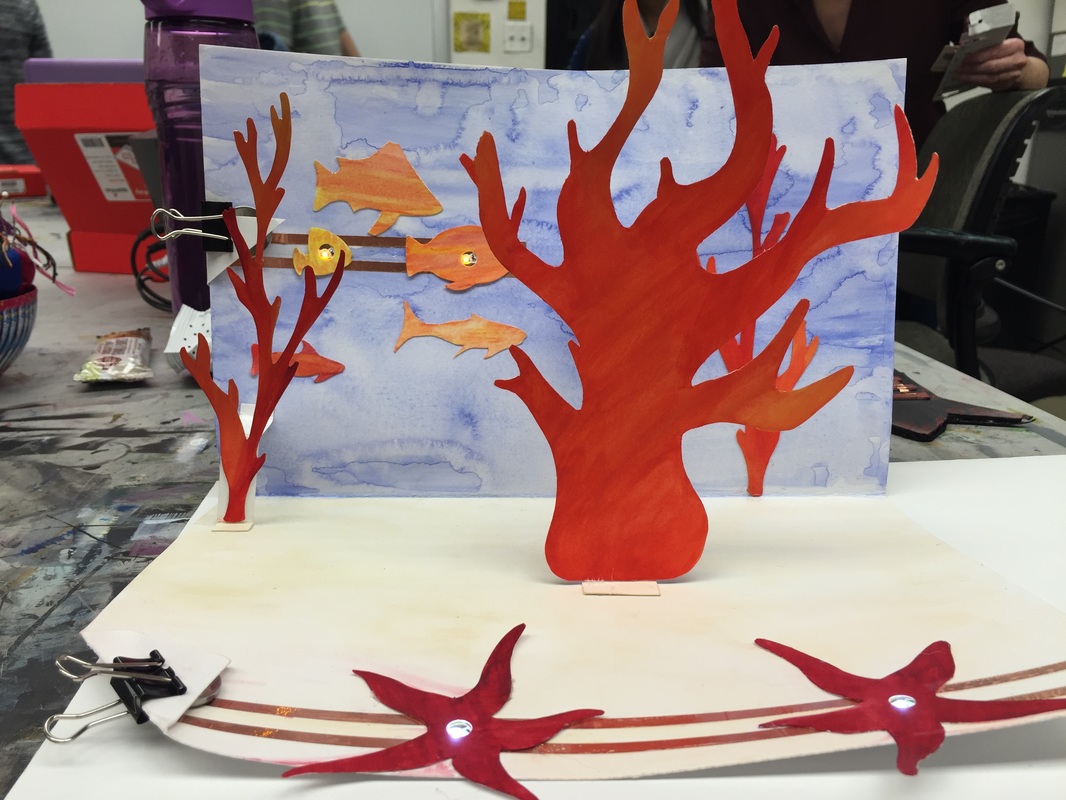
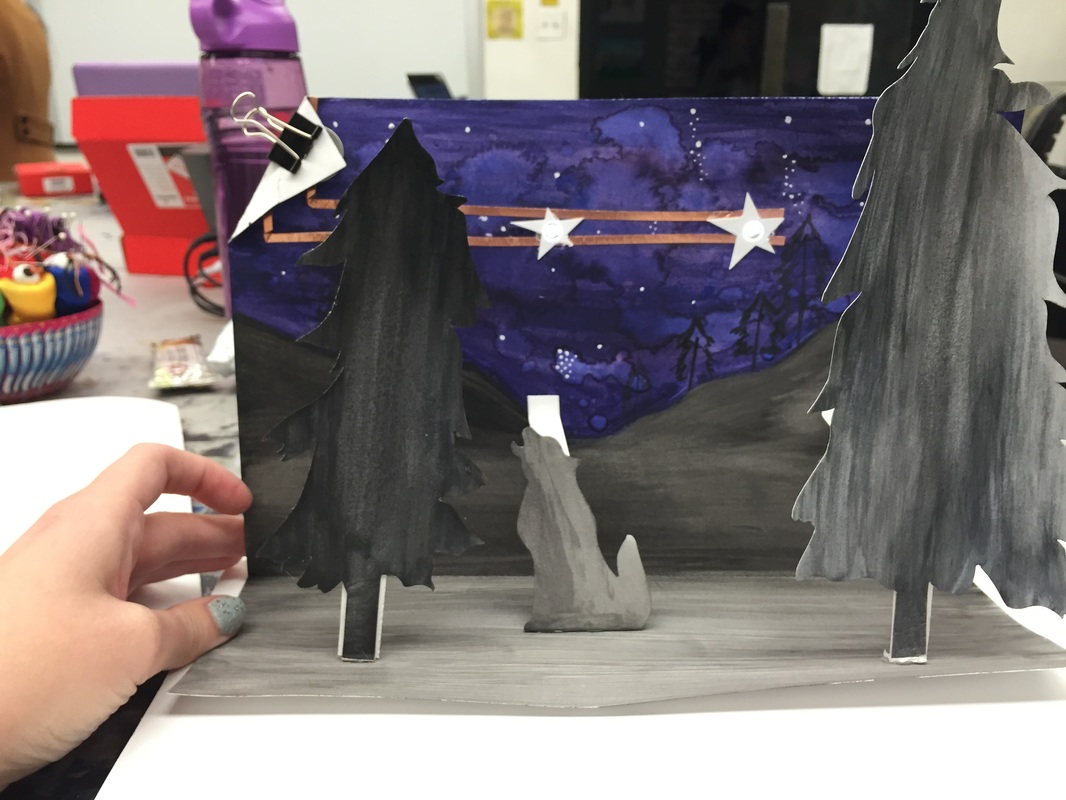
For my final project, I wanted to play with paper circuits and see how they would react in certain ways. I chose to do pop-up style cards that could be used later on in classroom projects. I did three different types of scenes, an underwater scene, a city scene and a forest at night scene. Playing with paper circuits was a lot of fun to configure. Using conductive tape was a different experience, it was a lot different to use than conductive thread. I chose to incorporate the tape into the first two scenes, and then conceal the tape on the last one. I used watercolor and cut paper to make these pieces. The paper is bristol board. Overall, I had a really fun experience making these. I definitely can see this becoming a classroom project later on.
|
|

|
Cassidy Del Orfano: Final Project
Sew Electric Dala Horse For the final project, I decided to create another Sew Electric project that was based on my Swedish heritage. The Dala horse is a symbol of a town in Sweden called Dalarna. The horses are typically hand-carved wood and hand painted. They were used as traditional children's toys, but have become the symbol of the city and Sweden. I decided to sew a traditional Dala horse, with red coloring, a white saddle and mane, and small embellishments. The batter holder is hidden by a flap on the saddle that can be buttoned down and secured. The battery can be hidden in a secret pocket on the mane. I had a wonderful time making this project. I love that my family gets really excited about these types of projects. It has been so fun to explore my heritage through new technologies. I love this project so much that I actually bought my own Sparkfun supplies so that I can continue to make these outside of class. Makey Makey Final Project
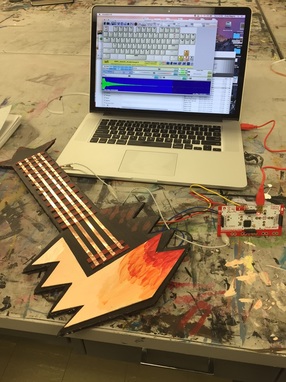
Omar Altieri On the right there is an image of my electric guitar incorporated with Makey Makey and plugged into the computer. Once one of the copper strips is touched a specific sound will resonate corresponding to each copper strip. With this project my approach was different and a lot more successful. I spent more time planning out and realized that I didn't encounter as many problems or complications as I did with previous projects because I didn't plan as much. So I learned that planning makes a difference. Although I'm happy with the final product I must say if I would redo this project I wouldn't use the same colors to paint the electric guitar. The only challenge I encountered was cutting the main shape out. Other than that everything else went smoothly. Overall I'm very proud of musical instrument and happy I took this course. It was a good way to get my mind off of things and focus on my projects. |
|
|
Final Project: MakeyMakey
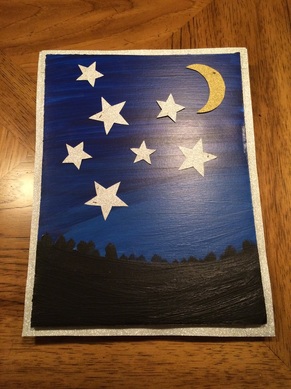
Alicia Legland For the final project, I decided to work with MakeyMakey. I had done something new for each project so I wanted to continue that process. Although the initial goal was to make an instrument, I chose to do something a little different; I wanted to make a scene with a few parts that when touched would make a sound. I started with a piece of foam board and painted a night sky. The inspiration grew from there and I cut out stars and a moon in glitter and found a shooting star sound to play when some of the stars were touched. I was shocked that it actually worked after my first attempt at setting it up. I am very happy with the result and I think this was my best project for the class. |
|
Sew Electric: Plush Monsters
Deanna DelSanto: Plush Monster
|
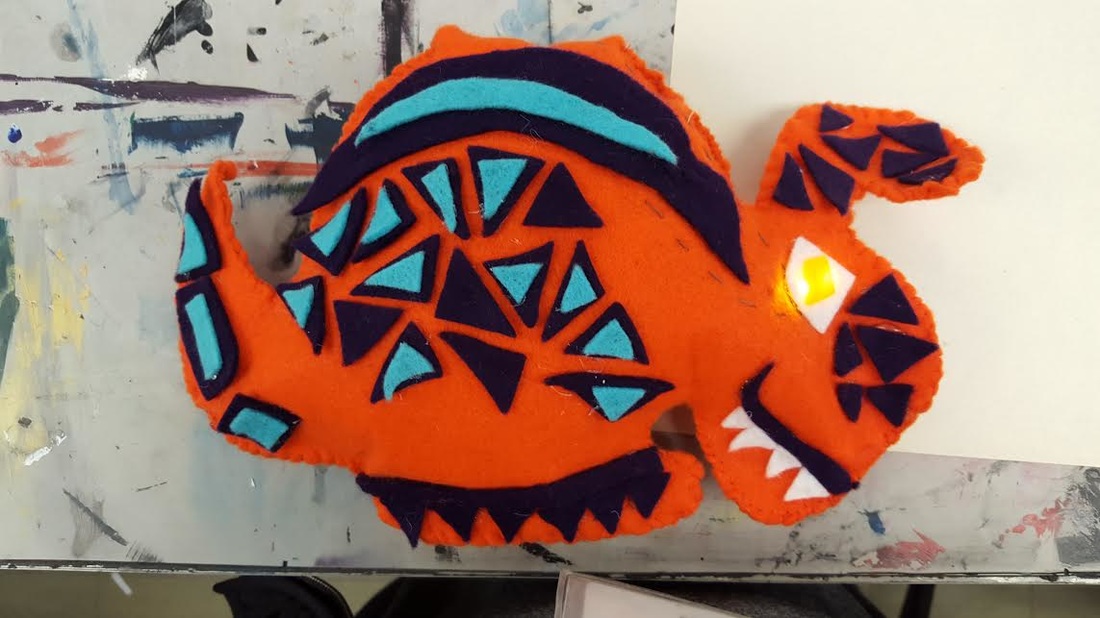
This was definitely a project that took me a very long to configure. I came up with the idea of a kraken, which was a lot of fun to start creating. Along the way there were a lot of snafus, but overall came out pretty cool. The bottom left light is connected to it's own function, while the top light and bottom right light are connected to the same function. Stuffing him also proved to be a challenge, as after he was stuffed the lights stopped working. But somehow it worked itself out and I got my lovely little kraken.
|
|
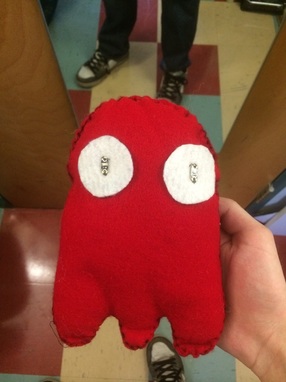
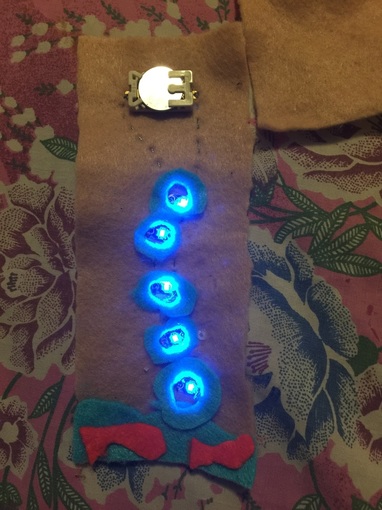
Eric Askedall: Final Plush Monster Pac-Man Ghost
This Project was a lot of work, but in the end worth the credit of doing something I thought I could never even do. I put a lot of extra time into this making sure each thread had a connection and made sure each piece was looped at least 3 times by wire. I enjoyed working on this project and I find the sewing to be somewhat therapeutic. I'm no expert sewer so the outside could have came out a little better and the embellishments came out decent. This piece will definitely sit in my room, really happy with the end result!
This Project was a lot of work, but in the end worth the credit of doing something I thought I could never even do. I put a lot of extra time into this making sure each thread had a connection and made sure each piece was looped at least 3 times by wire. I enjoyed working on this project and I find the sewing to be somewhat therapeutic. I'm no expert sewer so the outside could have came out a little better and the embellishments came out decent. This piece will definitely sit in my room, really happy with the end result!
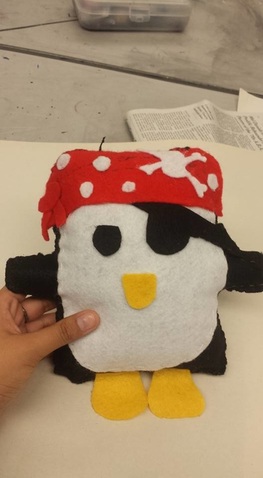
Jackie Perez - Pirate Penguin Plush Monster
|
|
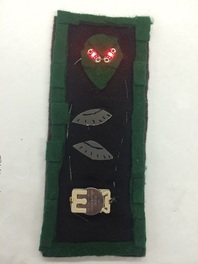
Keanna Jardine- Plush Monster
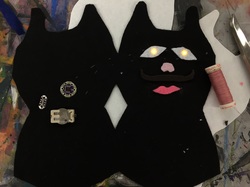
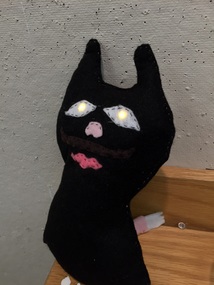
This project was very tedious. From the sewing to the cutting of the fabric it was a lot but I was pleased with my end result. It was below the standard I set for myself but I dedicated a lot of work and time into making it.
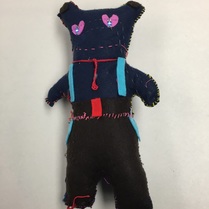
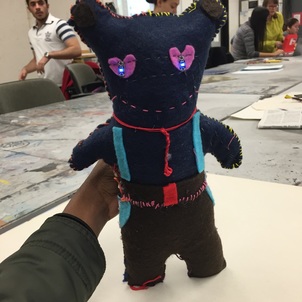
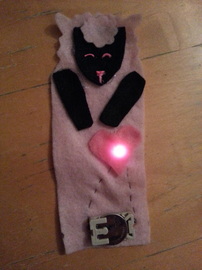
My inspiration was the Berenstain bears outfit wise but in terms of the monster side of it I just came up with a concept I saw fit. I decided in the middle of creating the eyes that I would turn the eyes into hearts which suggest contradictory behaviors of what we expect a typical monster to look like and act. It was my little twist and it was fun. The colors were festive and bright which I wanted. I chose the lights to do the blinking action which suited the overall look and feel of the bear. Concluding it was fun but required patience I did not have at times.
This project was very tedious. From the sewing to the cutting of the fabric it was a lot but I was pleased with my end result. It was below the standard I set for myself but I dedicated a lot of work and time into making it.
My inspiration was the Berenstain bears outfit wise but in terms of the monster side of it I just came up with a concept I saw fit. I decided in the middle of creating the eyes that I would turn the eyes into hearts which suggest contradictory behaviors of what we expect a typical monster to look like and act. It was my little twist and it was fun. The colors were festive and bright which I wanted. I chose the lights to do the blinking action which suited the overall look and feel of the bear. Concluding it was fun but required patience I did not have at times.
Collin Savage: Final Plush Monster
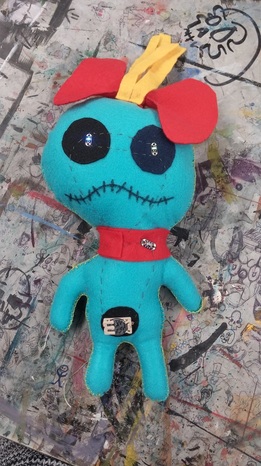
This took much longer than I had expected. First I ended up cutting out two separate pieces instead of having a joined arm. Then I end up sewing the electric thread with incorrect currents. The embellishments didn't quite come out how I had planned, and in the end I thought it looked a bit funny and definitely different from what I had planned. HOWEVER, after I spent a couple hours working on this, I ended up having a great time working on it, and I'm fairly proud of my final project. It might not be the actual Scrump, but I think it's fairly close, and the eyes light up.
This took much longer than I had expected. First I ended up cutting out two separate pieces instead of having a joined arm. Then I end up sewing the electric thread with incorrect currents. The embellishments didn't quite come out how I had planned, and in the end I thought it looked a bit funny and definitely different from what I had planned. HOWEVER, after I spent a couple hours working on this, I ended up having a great time working on it, and I'm fairly proud of my final project. It might not be the actual Scrump, but I think it's fairly close, and the eyes light up.

|
|
|
Christina Collado: Plush Monster
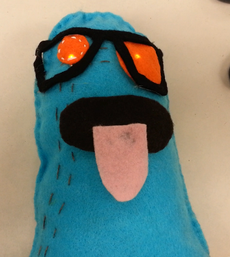
This is the final product of my plush monster. I made the lights blink and I covered them so they can act as the eyes on my monster. I also gave my monster a face and glasses. Thanks to the bookmark project, the sewing for the plush monster came a lot easier after you figured out which components had to be connected to each other. I learned that if you leave the battery in the battery holder that it might leak into the circuit and the lights won't light up. Overall, I had a lot of fun doing this project! |
|
|
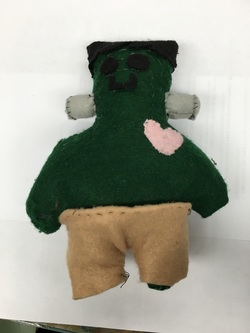
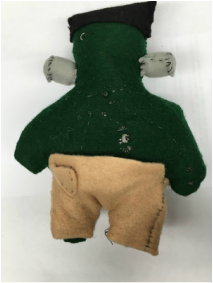
Tatiana Bermeo- Plush Frankenstein
This is my finished Frankenstein project. I am happy I was able to accomplish the sewing of the electrics the way I pictured it in my head. It was successful electrically but I think if I would have used a lighter felt color the lights would have shown through better. Overall I am satisfied and learned a lot for when I decide to create another one. |
|
Omar Altieri
Plush Monster Here are two photos of my plush monster. The first photo is of my plush monster before being stuffed and sewn and the second photo is after being stuffed and sewn. Throughout all the projects we've worked on this semester this one was the most time demanding. Incorporating the switch into this project deemed challenging due to the nature of this power circuit. When it came time for sewing I was most worried about the symmetrical sizes not fitting together perfectly to create the plush monster but careful sewing and patience eliminated that problem from occurring. If I would redo this project I would stuff my plush monster more to give it a more round look. |
|
|
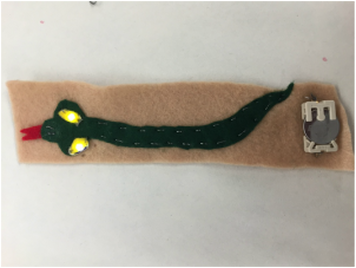
Nicole Leyland: Sew Electric Monster
Here is the finished product! This was hands down the most tedious project yet. I had to re-sew my circuit 3 times. I think it was due to my original layout. I had one light as the eye and another at the top of the monster's head. I think the LED lights were spaced too far a part. It didn't create a true parallel circuit. I altered the lights, putting them as the eye instead of keeping them separate and I made smaller, tighter stitches. This was more successful and the circuit connected without a problem! My monster design was inspired from a lizard and an angler fish. I morphed the two animals to create this hybrid. That's why I originally included a light at the top of the head, to reference the angler fish alluring glow. I was a little disappointed that the original plan didn't work out, but I think that it came together really nicely overall! |
|
|
Cassidy Del Orfano: Sew Electric Troll
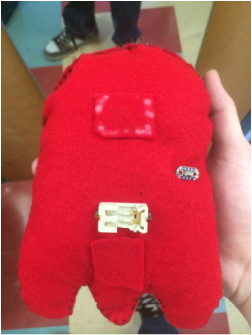
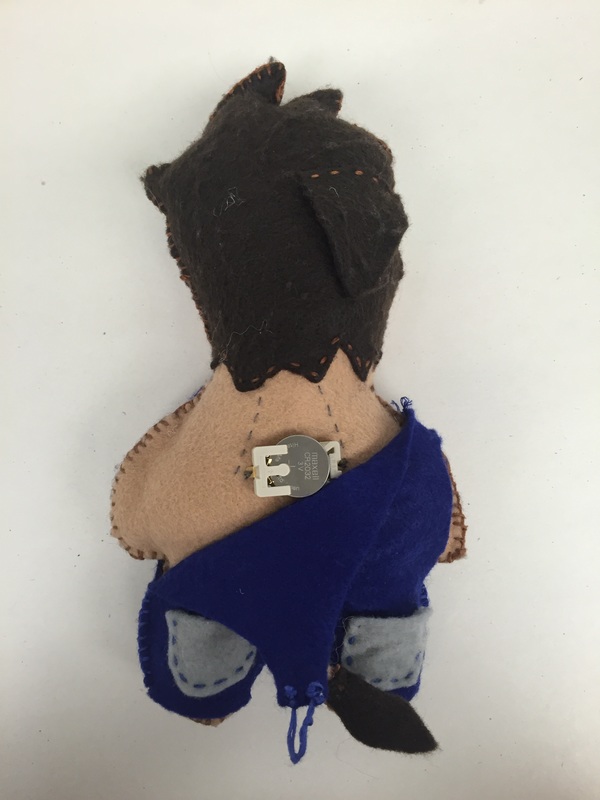
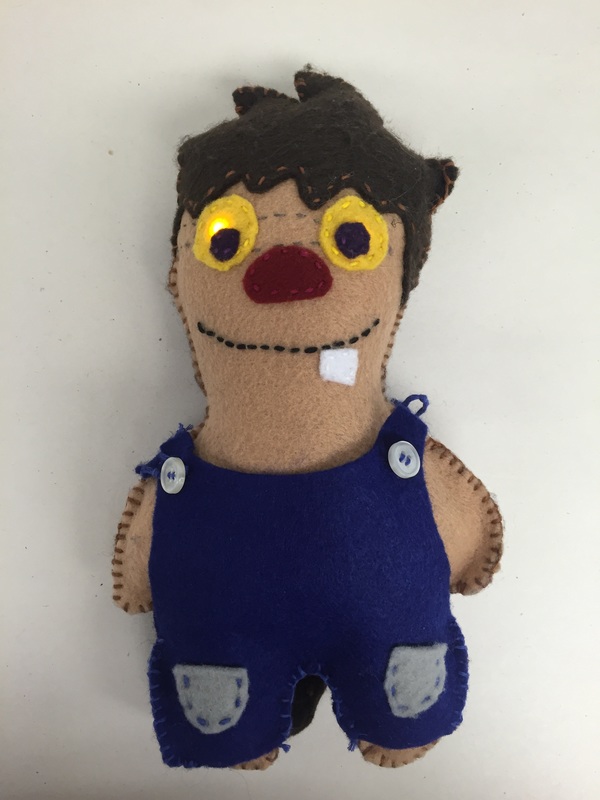
The troll is an important part of Swedish folklore. The troll is a helpful, kind-hearted creature. I wanted to express the nature of the friendly troll with this piece. I do not like when the electrical components are visible in the design, so I hid them to the best of my ability. The switch is hidden by a flap in the hair, which can be flipped up to access the switch. The overalls hide the battery holder. They have to be unbuttoned, and pulled back to expose the battery holder. The battery is stored in either of the back pockets. This was one of the most fun projects so far. My family was very excited about the troll. It was a learning experience to learn how to sew a button, and make overalls with my mother. |
|


|
Alicia Legland: Plush Gingerbread Man
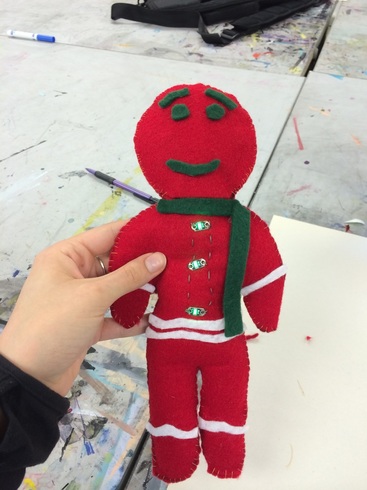
For my plush monster project, I decided to go with a form that was not so "monster-like" and more festive, as we approach the holiday season. I created a template on paper of the gingerbread man and traced it onto the felt. We unfortunately didn't have any dark brown felt so I used red felt with green and white embellishments. I traced two forms connected at the arm to make sewing the outside and stuffing the form a little easier. Using the conductive thread, followed a parallel circuit to attach three green LED lights to the battery holder and the LilyTiny microprocessor. After the electric elements were finished, I added the embellishments with hot glue. The final, and probably the largest, step was sewing up the gingerbread man and stuffing it. I used standard gold thread to sew up the form to continue with the festive holiday aesthetic theme. The straighter areas of the form were easier to sew; the turns under the arms for example were a little bit more challenging to sew. This class has been my first experience with sewing and I think I felt more at ease with the needle and thread with this project. I like the way it came out, especially when it became more three dimensional after I stuffed it. Additionally, I learned that the coin battery cannot be left in the battery holder because it will drain. After changing the battery for a new one my lights worked again and all was well with my gingerbread man's lights. |
|
|
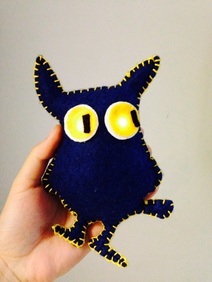
Yuhao Qiao
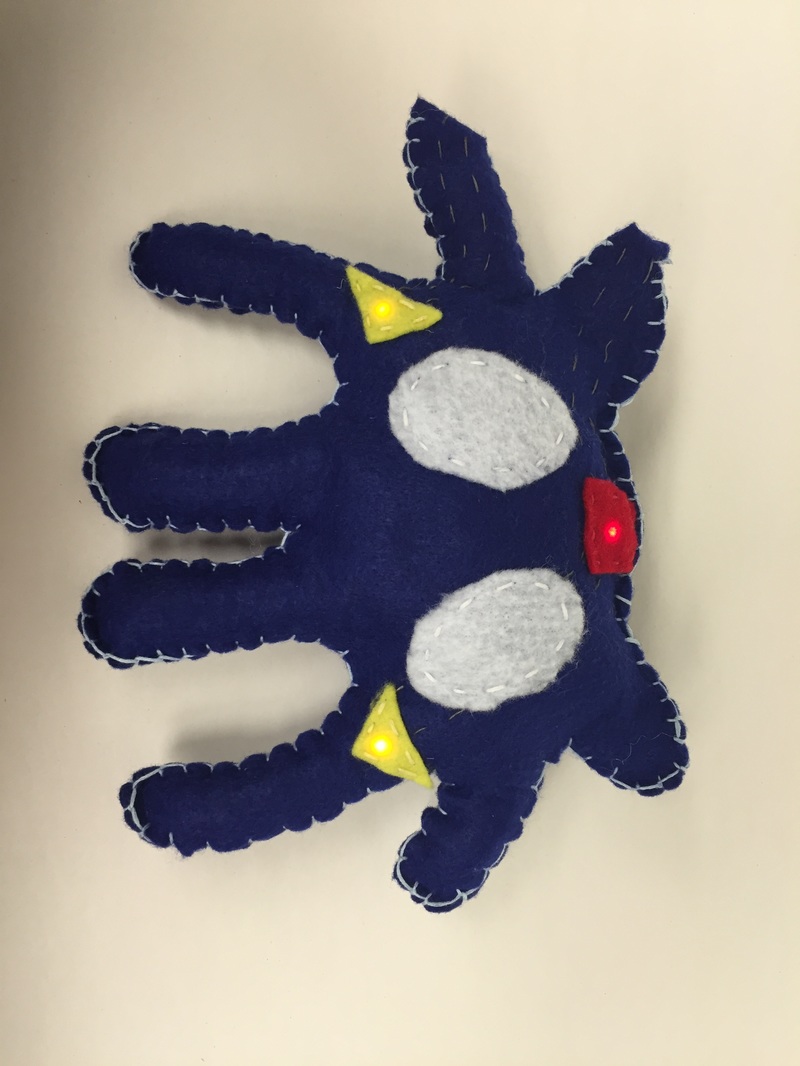
Plush Monster Owl I really like this little monster owl. It was almost identical to how I envision it to look. This design is very simple - a body outlined and cut from fabric and a pair of glued and sewed LED-lit eyes that 'randomly twinkles' by the programming from the lilymini. I really like how its curious expression was adequate expressed through just these few elements. It's outline was the same yellow as its eyes, this was also in contrast with it's dark-blue body that we could identify its posture clearly. When the owl was first finished, its battery was on the inside. This would drain its power and I had to dissect the owl to remove the battery; but this also inspired its tiny battery bag that hides the 'cut'.If I were to make it again, I would have made it bigger as the current size made it difficult for cutting and sewing; a bigger design would also produce more plushy ears. |
|
Bookmark Booklights
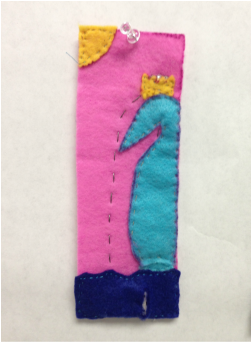
Keanna Jardine- Final Bookmark
This is my final bookmark, It did not turn out exactly how I wanted but it came very close and I am pleased with it. I chose bright colors that complimented the overall idea I had for the piece. The picture is a kingfisher with a crown standing in water looking out in the sea. This was a fun project but was very tedious especially when it came to cutting the felt. The light is not shown in this photo but the light is at the crown, it is a white LED and it looks cool. This project also made be resurrect old skills like sewing which I haven't done in a very long time and used a bit of circuit theory to get the whole system to work.
This is my final bookmark, It did not turn out exactly how I wanted but it came very close and I am pleased with it. I chose bright colors that complimented the overall idea I had for the piece. The picture is a kingfisher with a crown standing in water looking out in the sea. This was a fun project but was very tedious especially when it came to cutting the felt. The light is not shown in this photo but the light is at the crown, it is a white LED and it looks cool. This project also made be resurrect old skills like sewing which I haven't done in a very long time and used a bit of circuit theory to get the whole system to work.
Collin Savage
|
|

Jackie Perez: Halloween Silhouette Bookmark
To the right is a photo of my completed bookmark. I had
a very hard time with this project once it came to shaping
out what I originally had on paper onto the felt material.
Because I was unable to complete most of it during class,
I had to take it home and cut the tree out there. The tree
I had originally designed was in the shape of a tree that
had lost all its leaves. The purpose was to create the Fall look
and Halloween look with the black felt. However, because I
did not have the appropriate scissors that made it simpler
to cut felt, I had a difficult time cutting the details of the tree's
branches. Although I tried, it just was not looking like the
picture I originally drew. As a result, I had d
|
Eric Askedall: Booklight Bookmark
Here is an image of my completed bookmark. I would say the hardest part was threading the needle.(First Time!) I am happy with the way it came out. I decided to give it a more creative look by creating a boarder around and also putting an additional piece of fabric on the back.(to hide threading) . I used super glue for the boarder and realized that it left a white film over spots that were coated heavier. So I added additional fabric over those spots to keep the colors clear. I feel that adding the Ships creates more of that alien feel I was going for. Overall this piece came out great! |
|
|
Rupinder Kaur: Final Bookmark Booklight Project
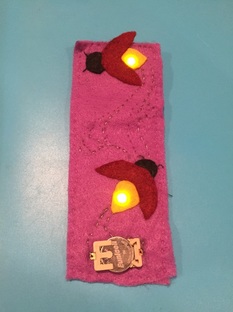
This is my booklight bookmark. It did not turn out to be exactly what I was hoping for. I wish it was a bit more intricate. I do still appreciate how the lights look and the learning process. The learning process taught me how to sew (somewhat) I understood how circuits worked. My lights are supposed to be bubbles coming out of the ocean (How realistic right? lol) This was a frustrating project because of the focusing and patience required BUT I learned and took a lot from it. The skills I learned, I was able to apply on the Plush Monster project. |
|
|
Omar Altieri
Final Bookmark On the right you can see a photo of my final bookmark project. I'm satisfied with the outcome since it was my first time attempting to complete an electrical circuit within my design. It was somewhat challenging in the beginning to get the LED lights to turn on but after a few trials I got the hang of it. If I would redo this project I would probably spend more time focusing on the design and I would cover the battery to make it more aesthetic to look at. Overall I enjoyed working on this project except for the part where it involved cutting the felt. I couldn't see it get the hang of it the first couple of cuts. |
|
|
Nicole Leyland: Booklight Bookmark
Here is a photo of my finished bookmark! I think it turned out ok! I altered some parts of my original design. I chose to only use one light instead of two and eliminated the sun because of the size of my bookmark. I glued the rocket ship together, glued down the stars in the background and incorporated the light into the flame of my rocket ship. I feel as though that my design wasn't as intricate and creative as others in our class. I went with a simpler layout. I really liked the snail piece from our class and that sparked some different ideas in my mind. I liked that the bookmark was the shape of the animal. Perhaps I could make a second one for fun using that same technique! I was pleasantly surprised with my sewing ability. It was something that I have never done before, and after some practice, I got the hang of it! I was so happy when I put the battery in to test it. It still blows my mind how this piece of thread can crete a circuit and help conduct electricity. It's pretty amazing if you think about it! Again, another project I need to bring into the classroom! I think the kids would really benefit from participating in a project like this! |

|
|
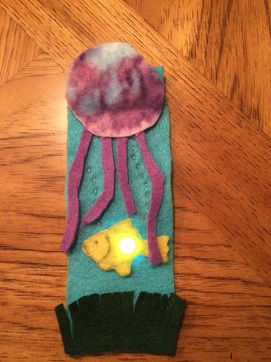
Alicia Legland
To the right is my finished bookmark. I like the way it came out--and the fact that the circuit worked! This was my first time ever sewing anything so after a few trials, and some sewing 101 help from Professor Maguire, I was able to sew the conductive thread and successfully anchor down the battery holder and LED light. I was moving pretty slow since I'm not used to sewing, but once I got the hang of it I realized it's not too hard. Although, what took a bit of concentration was trying to make sure the distance between the stitches was roughly the same length. I glued the jellyfish on as a flap to cover the battery holder; this was able to cover the not-so-pretty battery holder while still maintaining access to take the coin battery in and out. I was also very happy with my choice to use a pink, purple, and blue tie-dyed felt for the jellyfish because I thought it looked pretty realistic. All in all I thought this was a fun project and rewarding too--it was a great feeling to see the LED light glow when the battery was put in because I knew I connected the circuit correctly. I'd like to see what other "electronic textiles" I could make with the same technology and a bit more felt. |
|
|
Christina Collado
This is a picture of my completed bookmark booklight. I learned a lot about circuits while doing this project. I learned that you cannot have a continuous circuit, you must thread the negative side and the positive side seperately with conductive thread in order to have a complete closed circuit. I also improved on my sewing skills, something I was not very good at to begin with, which took immense concentration. Ultimately, I love the way my bookmark came out and I love how the bookmark is in the shape of an actual object as opposed to just a rectangle with a picture on it. This is the project I've had the most fun with so far! |
|
|
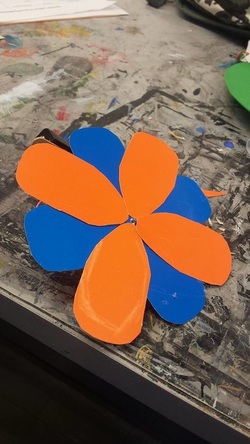
Tatiana Bermeo-Flower Bookmark
This is my finished bookmark! I am very happy with the way it came out even if it is a simple concept. I decided to add a back part to it to give the bookmark more stability and to cover up the stitching in the back. In the process of adding the back piece I realized that if I only sewed it on the sides and left an opening it became useful for putting something inside. Also, when covering up the battery holder I left a small opening so that there was easy access to the battery. This allows me to have somewhere to place the battery if I decide I want the lights off or if I had to change the battery. Overall I enjoyed this project and learned more in the process. Working with this kind of technology allows you to think outside the box and think of other possible ways to merge technology with art. |
|
Cassidy Del Orfano - Bookmark Booklight
|
|
Drawing Machines
|
Cassidy Del Orfano - Stegobot
I wanted Stegobot to paint using its feet. However, when I tried to put paint directly on its feet, it would get stuck and not move as a result of the sticky paint. I figured out that if I put paint directly in the path of Stegobot, it is able to drag the paint onto the paper. |
|
Collin - Wind-Based Drawing Machine

|
|
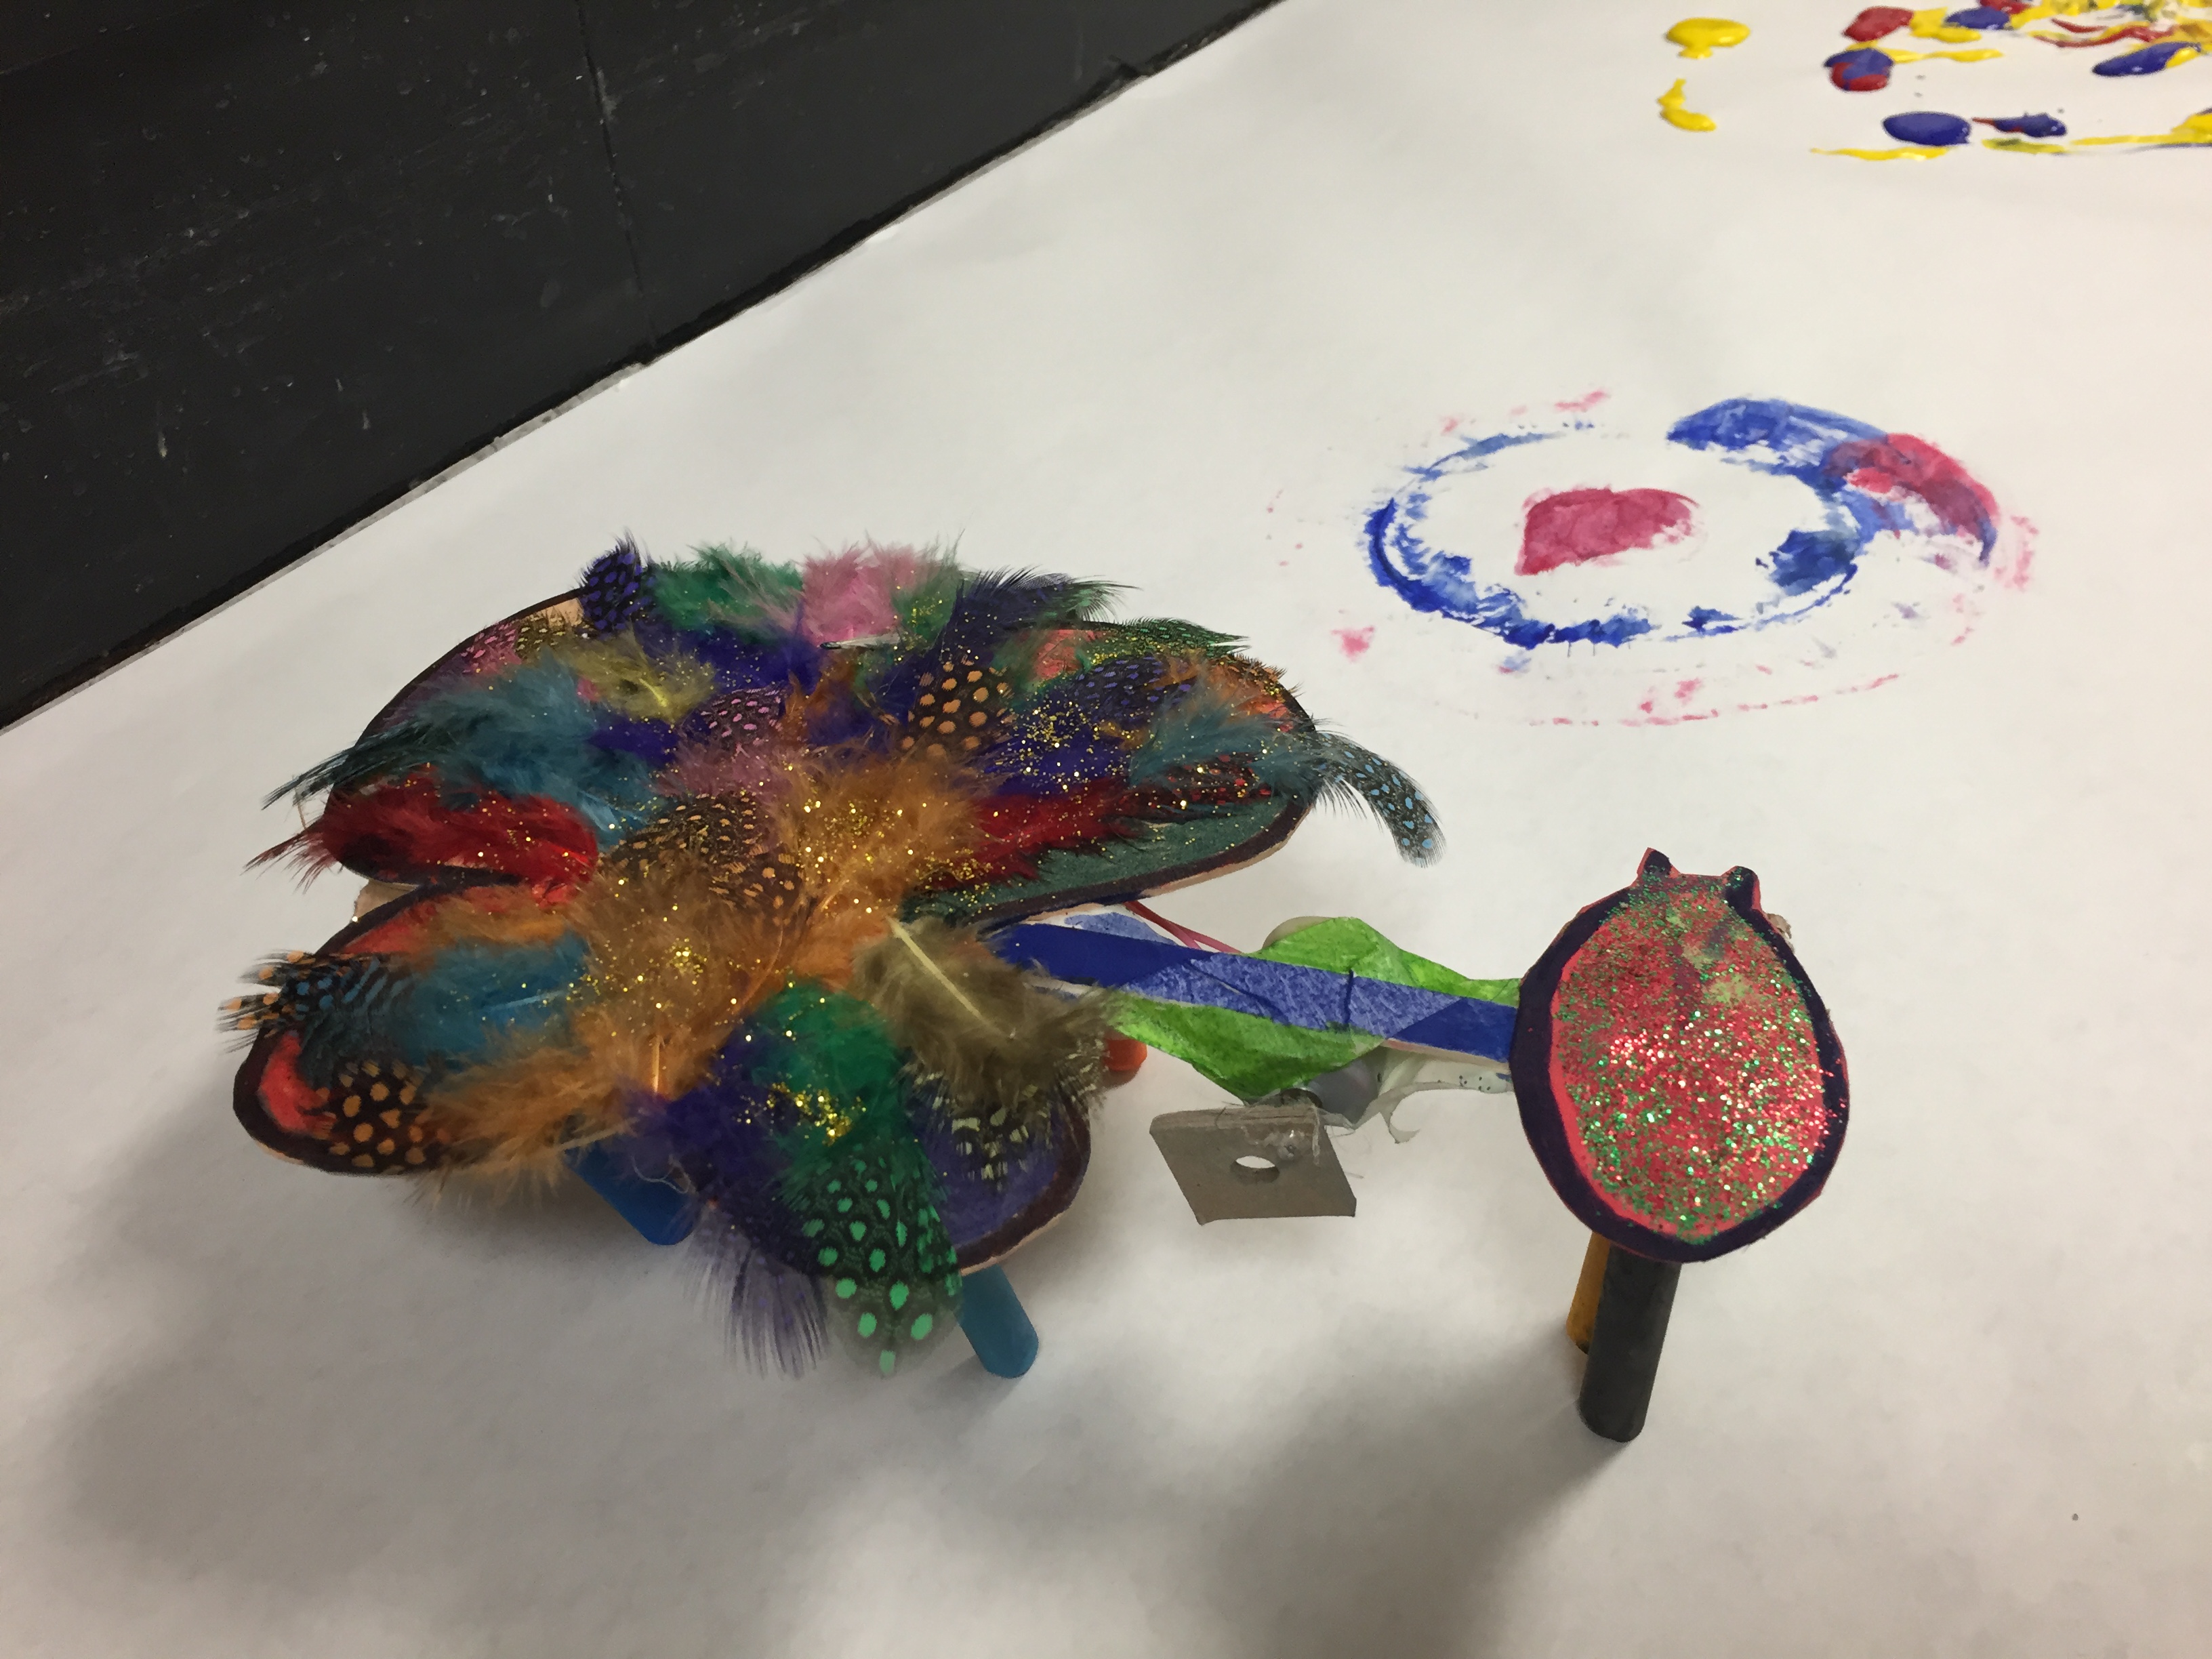
Deanna DelSanto - Tortoise Drawing Machine
|
|
Tatiana Bermeo: FINAL RESULTS OF DRAWING MACHINE:
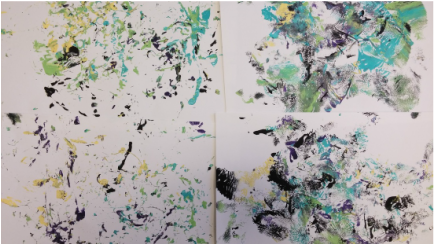
Here are pictures of my process of making my machine more visually appealing. Also, once I tried out the machine at first it went perfectly in circles creating a pattern but then as the soft pastels were getting wasted, the movement of the machine shifted. My machine went from rapidly moving in circles towards one direction to slowly moving forward in a circular motion, less consistent of course.
Here are pictures of my process of making my machine more visually appealing. Also, once I tried out the machine at first it went perfectly in circles creating a pattern but then as the soft pastels were getting wasted, the movement of the machine shifted. My machine went from rapidly moving in circles towards one direction to slowly moving forward in a circular motion, less consistent of course.
|
|
|
Omar Altieri
Final Drawing Machine
Here is a video of my final project of the drawing machine. Originally I had planned on making a robot-like design but midway as I was working on it I decided to make a bridge in the middle of the ocean. I think that design was influenced by the poster in my room which is on the Golden Gate Bridge. The major challenge I faced while working on this project was that the motor kept getting loose from the tape I had used to put it into place. Once I used a couple of wooden sticks and glue that problem was taken care of. If I would redo this project I would probably spend more time offsetting the motor to get a better pattern. Overall, I'm happy that my drawing machine actually moves on it's own and draws.
|
|
|
|
Rupinder Kaur Final Project :
After morphing my drawing bug to some other thing and after so much trail and error, it finally came all together and worked! The movements were very strange. When i put it next to a plastic xujp of water, it made the water in the cup vibrate and create a circular pattern. On its own it just went it different directions pushing other machines out of its way! What a bully! |
|
Nicole Leyland - Week 4: Final Design & Video
Here is my final product! My monster/bug drawing machine. The motor and the battery are glued on the inside of the bowl and the markers are the legs. It moves in a circular pattern.
Here is my final product! My monster/bug drawing machine. The motor and the battery are glued on the inside of the bowl and the markers are the legs. It moves in a circular pattern.
Here is my final product! My monster/bug drawing machine. The motor and the battery are glue on the inside of the bowl and the markers are the legs. It moves in a circular pattern.
Eric Askedall- Week 4 Final Design and Video of Drawing Machine.
My spider machine moves in a circular pattern creating a unique blend of colors. I ended up having each leg at a different angle/height in order to create unrepeatable patterns.
Alicia Legland
Here is a video of my final drawing machine! I changed the design up a bit; I liked the stripes much better. I also found that hot gluing the paper decorations allowed for a much neater final product that using double sided tape. I also affixed the battery holder in a different way that balanced the machine a little better and allowed for improved movement. This project was difficult to do at first; I was honestly just happy that I was actually able to get it to move at the beginning. But after working with it for a couple weeks I was more comfortable working with a motor and was able to work on design and finalizing the project as a whole. Again, I had never heard of a drawing machine before participating in this course. Having done research on professional drawing machines earlier in the semester, I was very intimidated when we were told to create one ourselves. However, using a small, simple motor and a few plastic recyclables the project seemed to put itself together over those couple of weeks. I was pretty happy with the final result. I sat down on the first day of working with it and I didn't know how to even begin, but by the end it really did come together.
Here is a video of my final drawing machine! I changed the design up a bit; I liked the stripes much better. I also found that hot gluing the paper decorations allowed for a much neater final product that using double sided tape. I also affixed the battery holder in a different way that balanced the machine a little better and allowed for improved movement. This project was difficult to do at first; I was honestly just happy that I was actually able to get it to move at the beginning. But after working with it for a couple weeks I was more comfortable working with a motor and was able to work on design and finalizing the project as a whole. Again, I had never heard of a drawing machine before participating in this course. Having done research on professional drawing machines earlier in the semester, I was very intimidated when we were told to create one ourselves. However, using a small, simple motor and a few plastic recyclables the project seemed to put itself together over those couple of weeks. I was pretty happy with the final result. I sat down on the first day of working with it and I didn't know how to even begin, but by the end it really did come together.
Christina Collado
This video shows the some of the process I went through designing my drawing machine and the final product is at the end of the video! I originally used rubber bands to hold the markers to my machines but I had to tape the markers instead because the rubber bands were not holding the markers in place as my machine moved. I decided to decorate my machine as a dancing lobster because that is what the movement of my machine reminded me of.
|
|
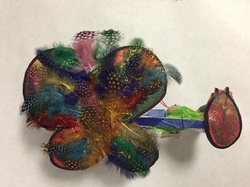
Keanna Jardine - Final Drawing Machine "Butterfly Lady Bug"
This was my final version of my drawing machine, which used drawing chalk as the legs or drawing tool of the machine. it is a butterfly and ladybug combo decorated with feathers and glitter. I had difficulty using drawing chalk as my legs which was not a bad idea because it turned out great but in the future for a brighter, smoother moving machine mini sharpies would be a better choice. |
Spinning Top: - Jackie Perez
I started off with making a fan-like top. My idea was to use the fan to make a bottle move while it used a pen to draw.
The water bottle is wrapped with a yellow felt sheet. |
|
Additional Work
|
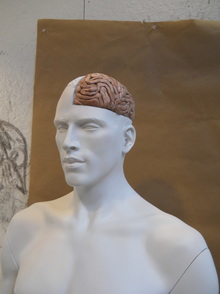
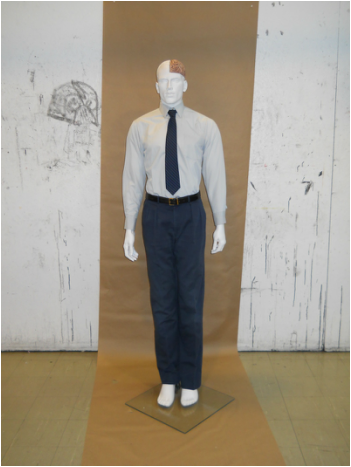
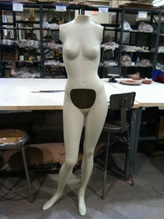
Lisa Pastore - In the last week, I have started and completed a new mannequin. This male mannequin will focus on the brain and depression. The first step in this process was to spray paint the mannequin white, because it started off as a neon orange color. Then I used a saw, file, and sandpaper to cut a quadrant out of the head and smooth it down. The brain was then made out of a mix of the plastalina clay and conductive play dough. After testing that the clay was conductive, I smoothed together coils to obtain a brain-like texture and painted in shadows. The main challenge with this piece was transporting it, because it was quite heavy and unstable. One new component that differed from one mannequin and the other was using the spray paint. One major challenge in spray painting was to cover the orange without too much paint building up in tight spaces.
|
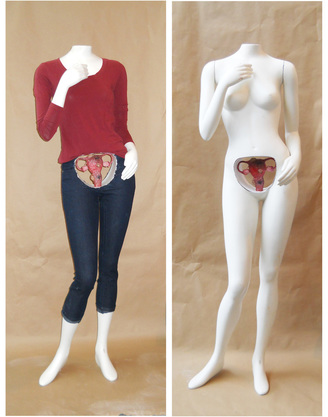
Lisa Pastore - For the past two weeks I have been finishing up cutting the hole in the mannequin and then experimenting with how to suspend it inside. To cut through the other side, I used a bristol board tubing that was measured to the size of the hole. I placed the tubing in one side and traced the hole on the opposing side. I then repeated the same process of drilling, sawing, filing, and sanding until the section was cleanly removed. Then I trimmed the tubing to fit the hole and hot glued it into the mannequin. In order to make the uterus stand up, I hot glued a wooden dowel rod into the tubing and pushed it through the clay uterus. This proved to be a challenge, because the first time I made this, the uterus fell over. It was because the organ is top-heavy and the dowel was not long enough to support all of its' weight. Once I completed the structure, I decided to play with clothing the mannequin. I am slowly learning different ways in which I can dress them to make a statement, but incorporate fashion in a way that it is not distracting to the message of the piece. In the process of clothing her, I tried to profile her and imagine what kind of clothing she would wear. The image to the left is a comparative image between being clothed and unclothed. I am still working through this step and am trying to consider many options.
Lisa Pastore - This week I have begun to cut a hole into the mannequin! In this image, I am only through one side of the mannequin so far, but intend to cut all of the way through. I began by drilling holes in a circular pattern inside of the section that I wanted to remove. Then I "connected the dots" by using a hacksaw to cut from one hole to the next. Finally, once the entire section was cut out, I filed and sanded away the excess and smoothed out the hole. One major challenge that I faced while completing this step was in learning how to deal with hazardous materials. The materials that I found when cutting open the mannequin were fiberglass and a raw resin that was sealed inside of the mannequin before allowing it to cure properly. I overcame this by working outside with a respirator to ensure that I was being safe in my process.
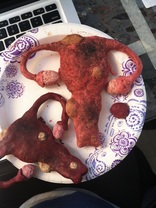
Lisa Pastore - This week I have been playing more with the conductive play dough recipe. Getting the proportions right within the clay to make it conductive has proved to be quite a challenge. Sometimes it is too dry, others not conductive. The smaller uterus on the left has the right consistency but I prefer the one on the right for coloring and design. I am working on a project involving human relationships to illness and disease, making clay organs within mannequins. The organs will be interactive so that the viewer can make a human connection to the faceless mannequin. This piece is a uterus with fibroids; a condition that is silent and unseen from the exterior, but very common.
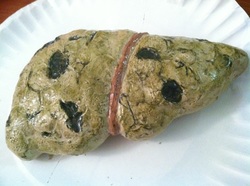
Lisa Pastore - I have been working on a conductive piece in exploration of my thesis topic. My latest work is the construction of a clay replica of the human liver that is suffering from cirrhosis. At first, my clay was not conductive, so I had to figure out a way to make the clay conductive. The process that I tested and proved successful was adding conductive play dough to the clay. Conductive play dough is a recipe commonly used my mothers as a toy for their children. It is made of water, oil, salt, and flour - completely edible. However, the mobile salt ions make the play dough conductive. Mixing this thoroughly into my clay has also made my clay conductive! Then color was added with water-based paint so that it would not interfere with the conductivity!
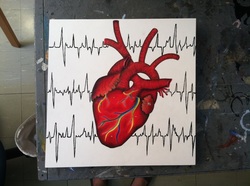
Lisa Pastore - This is a drawing of a human heart that I completed out of conductive materials! The heart was done with colored pencil and the background with conductive paint. Within the heart, I placed 3 LED lights that blink in a heartbeat pattern when the button is pressed. They are all connected in a parallel circuit that is controlled by the button opening and closing the circuit connection. In addition, the conductive paint - when connected to a make makey - makes a heartbeat noise when the heart monitor pattern is touched. It was a lot of fun to wrk on this project and I learned how to place multiple circuits and interactive parts within one piece!
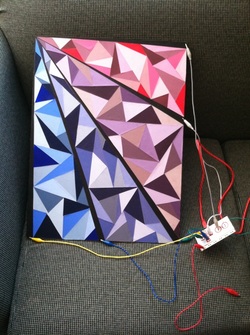
Lisa Pastore - This is the first piece that I have completed and is my first time using conductive paint! Through this project, I learned how to have multiple audio files hooked up to one piece. Each black line on the piece is reminiscent of a piano and each line has its own note noise! The main engineering problem that I had to solve was how to make it so that the circuit is not crossing. If the black lines touched, none of them would work because the circuit is crossing paths. To solve this problem, I used acrylic paint where the lines converge and continued with conductive paint once the lines were separated. All of the triangles were made with tempera paint and then hand-cut and glued onto illustration board.
